
How Lorenzo Got His Polisher – Part 2

An Unexpected Opportunity (see February post for Part 1)
One day, Stan calls me up and says, “Wanna buy the machine? I gotta move out of the shop—they’re selling the property and they want the machine out. You can have it for $300.” It was an incredible opportunity, but I myself was renting a workshop on historic Huguenot Street in New Paltz, NY then, and had no place to put the machine. So I declined Stan’s offer.
Time passed and I mulled things over. Up in New Paltz, my workshop neighbor was the farmer, Warren Jewett. Warren had given me rent-free use of a large old family cowshed, which I fixed up. That’s where I stored all the terrazzo chips I bought when Zanin closed, and later when Colonna & Co. folded as well. Warren was always so generous and helpful to me.
I wanted that polisher. I knew Warren Jewett would let me store the machine on his property and would help me move it with one of his two powerful tractors. I ran the idea by him, and he agreed as I knew he would.
So the problem was really on the Queens end of things. Next to Stan’s terrazzo shop was a sizeable construction yard, where all kinds of heavy equipment was parked. I asked Stan if he knew anyone there; and as it happened, he was great friends with the yard foreman. I went to speak with the foreman at the yard’s garage, and he was aware of Stan’s situation. I asked, “If I show up here with a flatbed truck, would you help me load Stan’s machine for $200?” With a dismissive wave of his hand, he said, “Sure, no problem.” He wanted to help Stanley out.
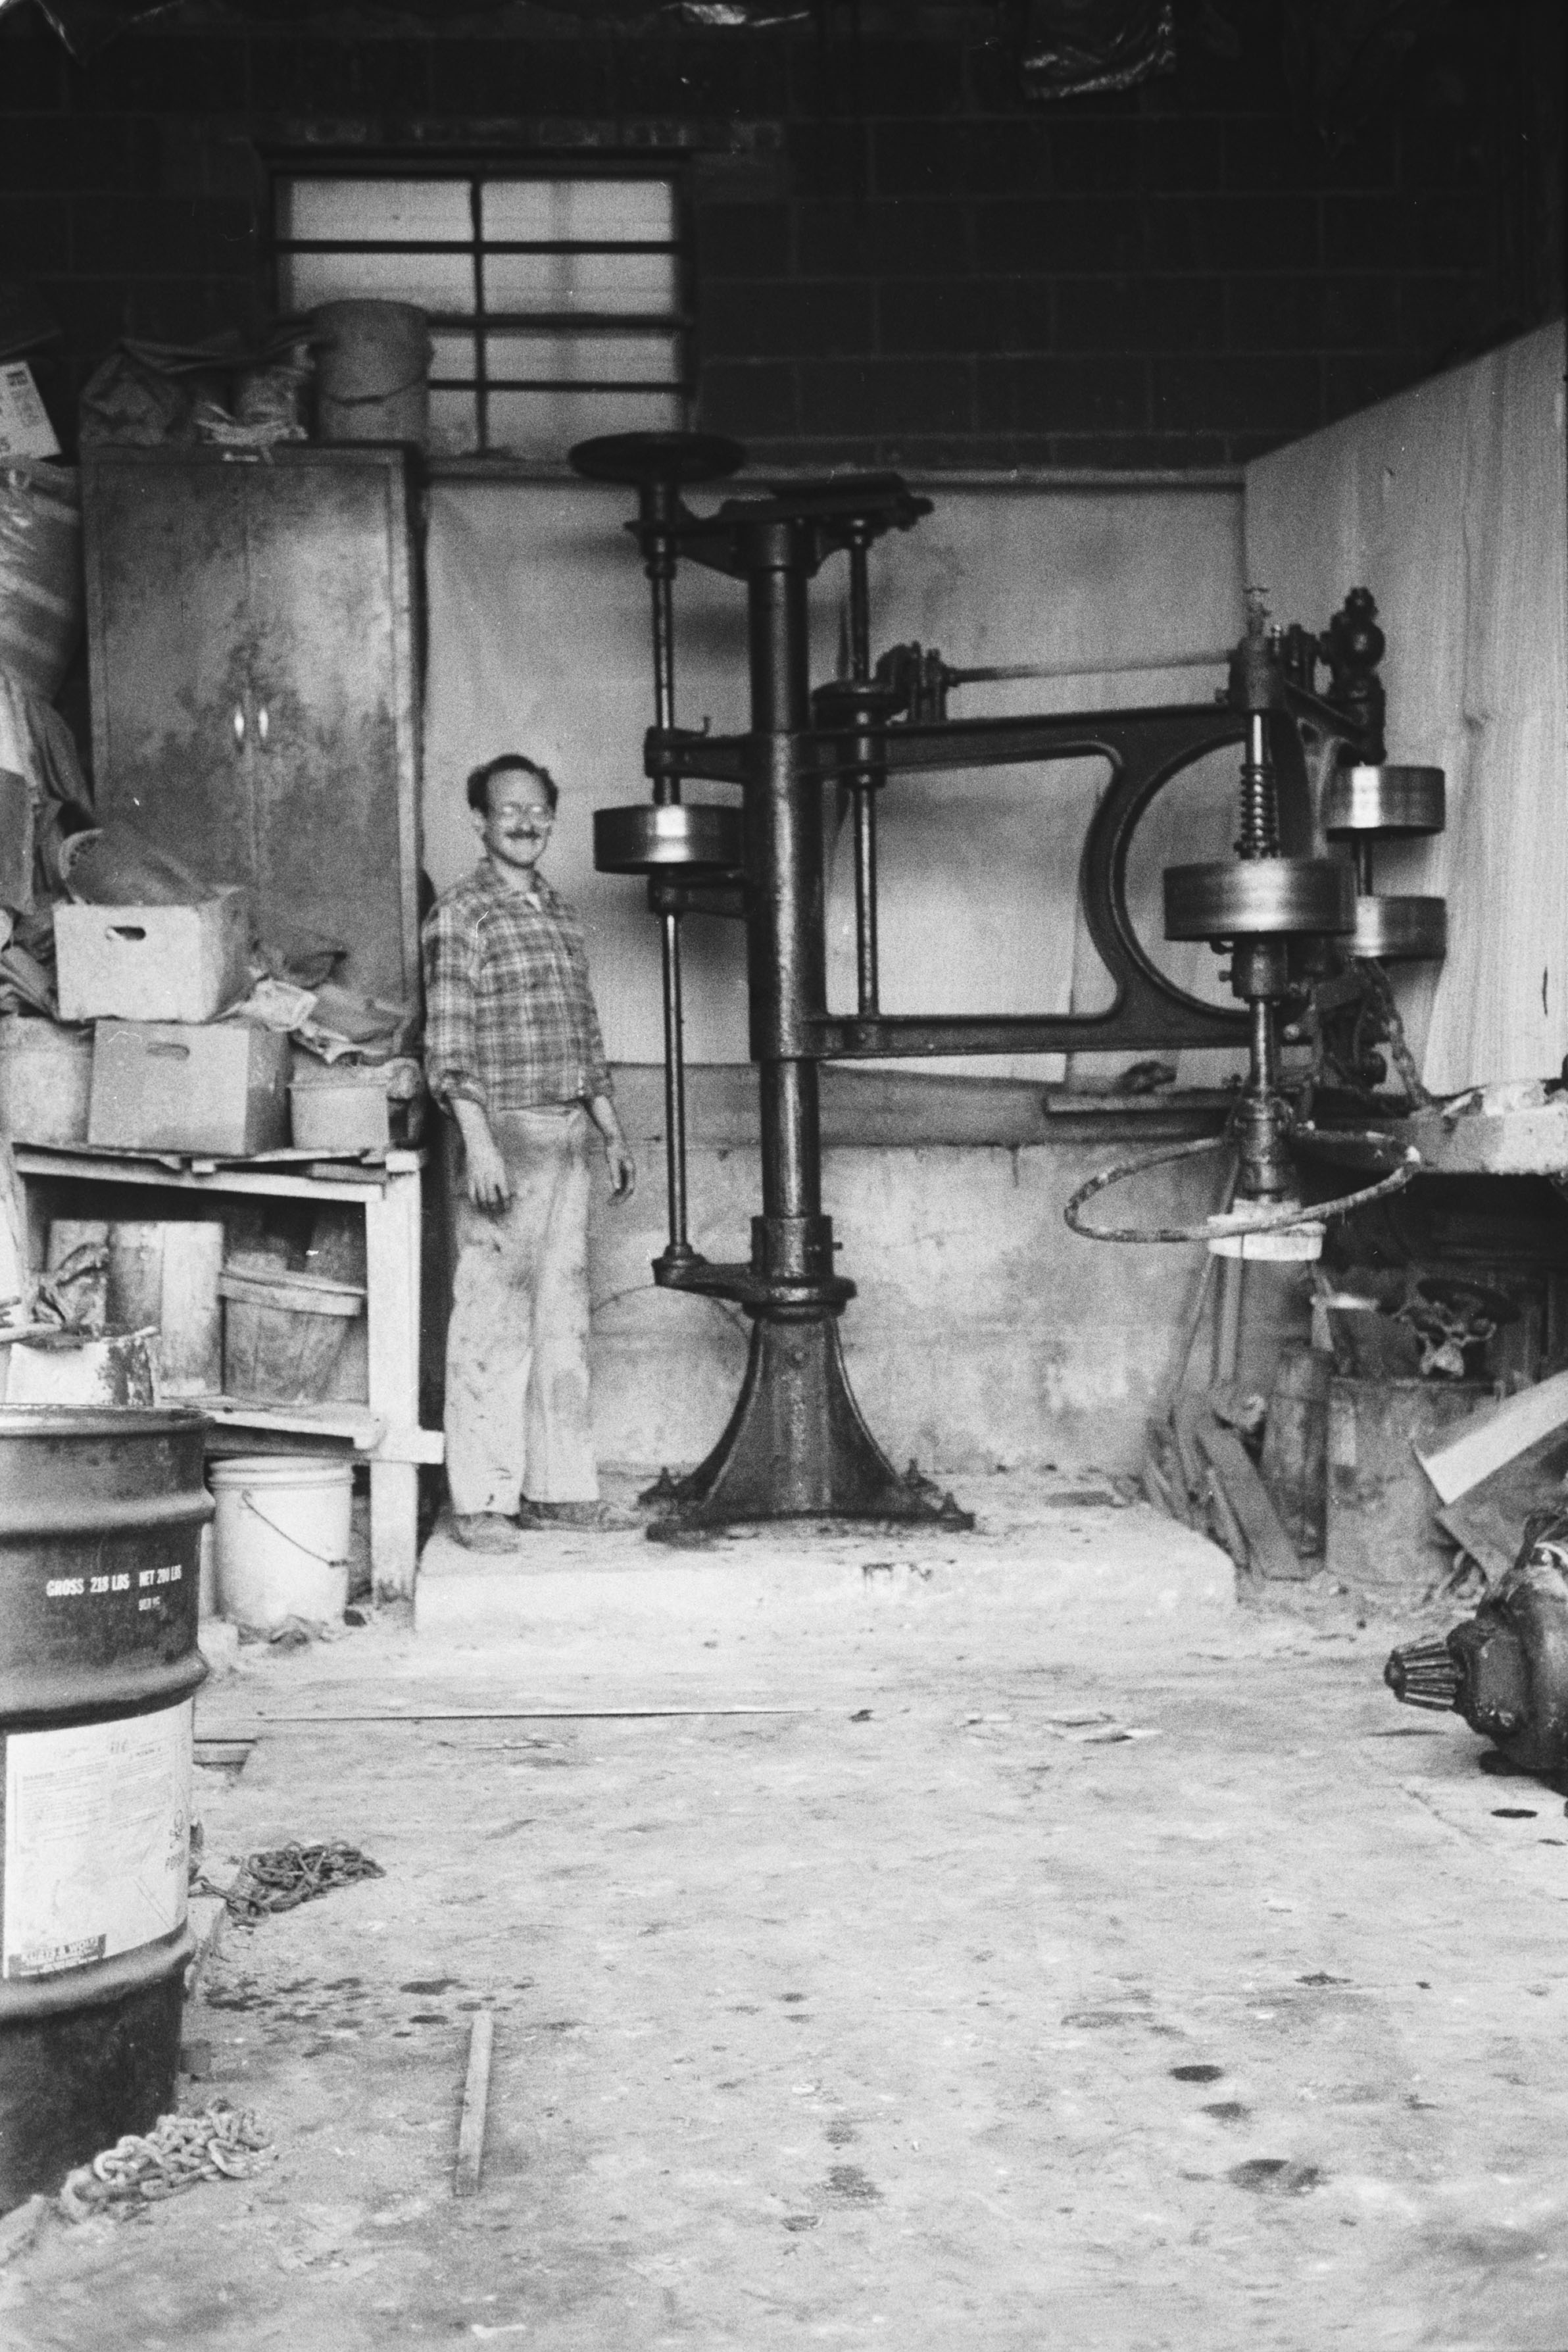
I was thrilled. I had hooked up both ends. I arranged a date for the pickup. Before that, I went several times to Stan’s to scrub the polisher down with kerosene and wire brushes. That’s why I’m filthy in the accompanying black-and-white photo, which was taken in October, 1988. There were decades of grease on that machine.
The day before our appointed Saturday moving date, I went over to see the construction yard foreman. It was Friday after 5pm. I went into the yard’s garage, and there he sat at a makeshift table, presiding over the largest poker game I have ever seen. There was a mountain of cash piled high on the table surrounded by all these construction workers. With my entry, they all froze like rats in a spotlight. I froze, too. The foreman said, “Oh, it’s you—we’re on for tomorrow morning, right?” “Yeah,” I said, and we all let you this huge collective sigh.
Next day, I show up at Stan’s with a large flatbed truck I rented. The yard foreman drives over on a backhoe with a monster wrench. We try to unbolt the machine from its concrete foundation, but it was rusted solid from decades of wet grinding. He chained the machine to the backhoe, then went back for a cutting torch and torched off the four large nuts. He lifted the polisher with the backhoe but it was unwieldy and quite heavy. He called for his son to come over with a forklift. The two of them did a lot of maneuvering to extract the machine. It was much more complicated than any of us had anticipated. They loaded the polisher. I strapped it down, paid them, and headed for the NY State Thruway. Turns out that the flatbed truck would not go above third gear. I drove 75 miles to New Paltz, doing 40 mph with the flashers on the whole way.
Warren Jewett sat waiting for me on his tractor as I pulled onto Huguenot Street. I drove into the pasture next to the cowshed, and Warren offloaded the polisher onto some pallets adjacent to the cowshed. I covered the machine and returned the truck to New York City. I was ecstatic.
I later built a vented shed over the polisher, and every Summer for twelve years, I would open the shed and brush clean motor oil over the machine.
I eventually bought a sizeable workshop 18 miles from New Paltz in the beautiful foothills of the Catskills. I rented a walk-behind diamond saw and cut a 4ft x 4ft opening in the concrete floor. I excavated to bedrock and bored into that to attach the steel reinforcement cage for the concrete foundation/counterweight. The hard part of erecting the machine was to center and keep vertical the four 1-inch diameter threaded rods that would protrude from the concrete base. These had to correspond exactly to the holes in the stanchion’s base flange. Happily when a backhoe lowered the polisher onto its new concrete base, it was a perfect fit. When I tightened the large nuts to the bolts securing the base flange to the massive concrete base, I heard choirs of angels singing.
I had the motor reconditioned, wired the on/off switch near the operator’s ring, and ordered new leather belting that was quite expensive. The silicon carbide grinding segments were no longer available, but I contacted National Grinding Wheel Co. They had the original molds and said that if I placed a large enough order, they’d fill it. I ordered a lifetime supply of segments, and so I’m good to go. I’ve added diamond technology as well, but there are times when I prefer silicon carbide.
My polisher, made by the Patch Company of Rutland, VT is now 102 years old and still runs great. They sure knew how to make things back then.
So there you have it—that’s how Lorenzo got his polisher.
This story is dedicated to Stanley Mazeka and Warren Jewett, two fine gentlemen who currently reside in heaven. Thank you for helping me, and I hope to do you proud. Rest in peace.
How Lorenzo Got His Polisher – Part 1
The Rescue of a Giant Antique
Back in the early 1980’s, I used to buy terrazzo chips and supplies at Zanin, which was one of the great old terrazzo supply houses. They were located in Weehawken, NJ, just on the other side of the Lincoln Tunnel. Inside their huge warehouse was a surreal landscape of pallets stacked high with a 100lb. burlap sacks of terrazzo chips, as far as you could see. It was eerily quiet and business was obviously dead. People there had time to talk, including old man Zanin himself, up in his office, who was quite chatty. Clearly all was not well. And acting on a hunch in January 1987, I called Zanin up to see how they were doing. The secretary said they were closing down, and all inventory was steeply discounted. I rented a truck and bought as many marble chips as I could. This was the beginning of my “terrazzo archive.”
One of the friendliest characters at Zanin was Marco, the forklift driver, who would load your order onto your truck. He was a ringer for Uncle Fester of the Munsters.
One day, a couple of years before Zanin closed down, Marco reached down from his forklift (which he called a high/low) and offered me a business card. He said, “Why doncha visit my friend Stanley?” The card said, “Allied Terrazzo Co. Precast Treads Risers Stringers Cove Base Sills & Saddles.” The address was 129th Street in College Point, Queens.
I called and arranged to visit Stanley at his workshop in an industrial part of Queens. He told me that I could bring some terrazzo to grind if I liked.
Stanley was a big strapping fellow of Polish descent, Stan Mazeka. He was a really nice guy, quite friendly, and in his mid-sixties when I met him. He commented jovially that we had a lot in common as non-Italians in the terrazzo trade. He told me that he had made 90% of the precast terrazzo stair treads for public schools in Long Island. Now, Stanley was just trying to pay the rent on his workshop by renting time there to people like me.
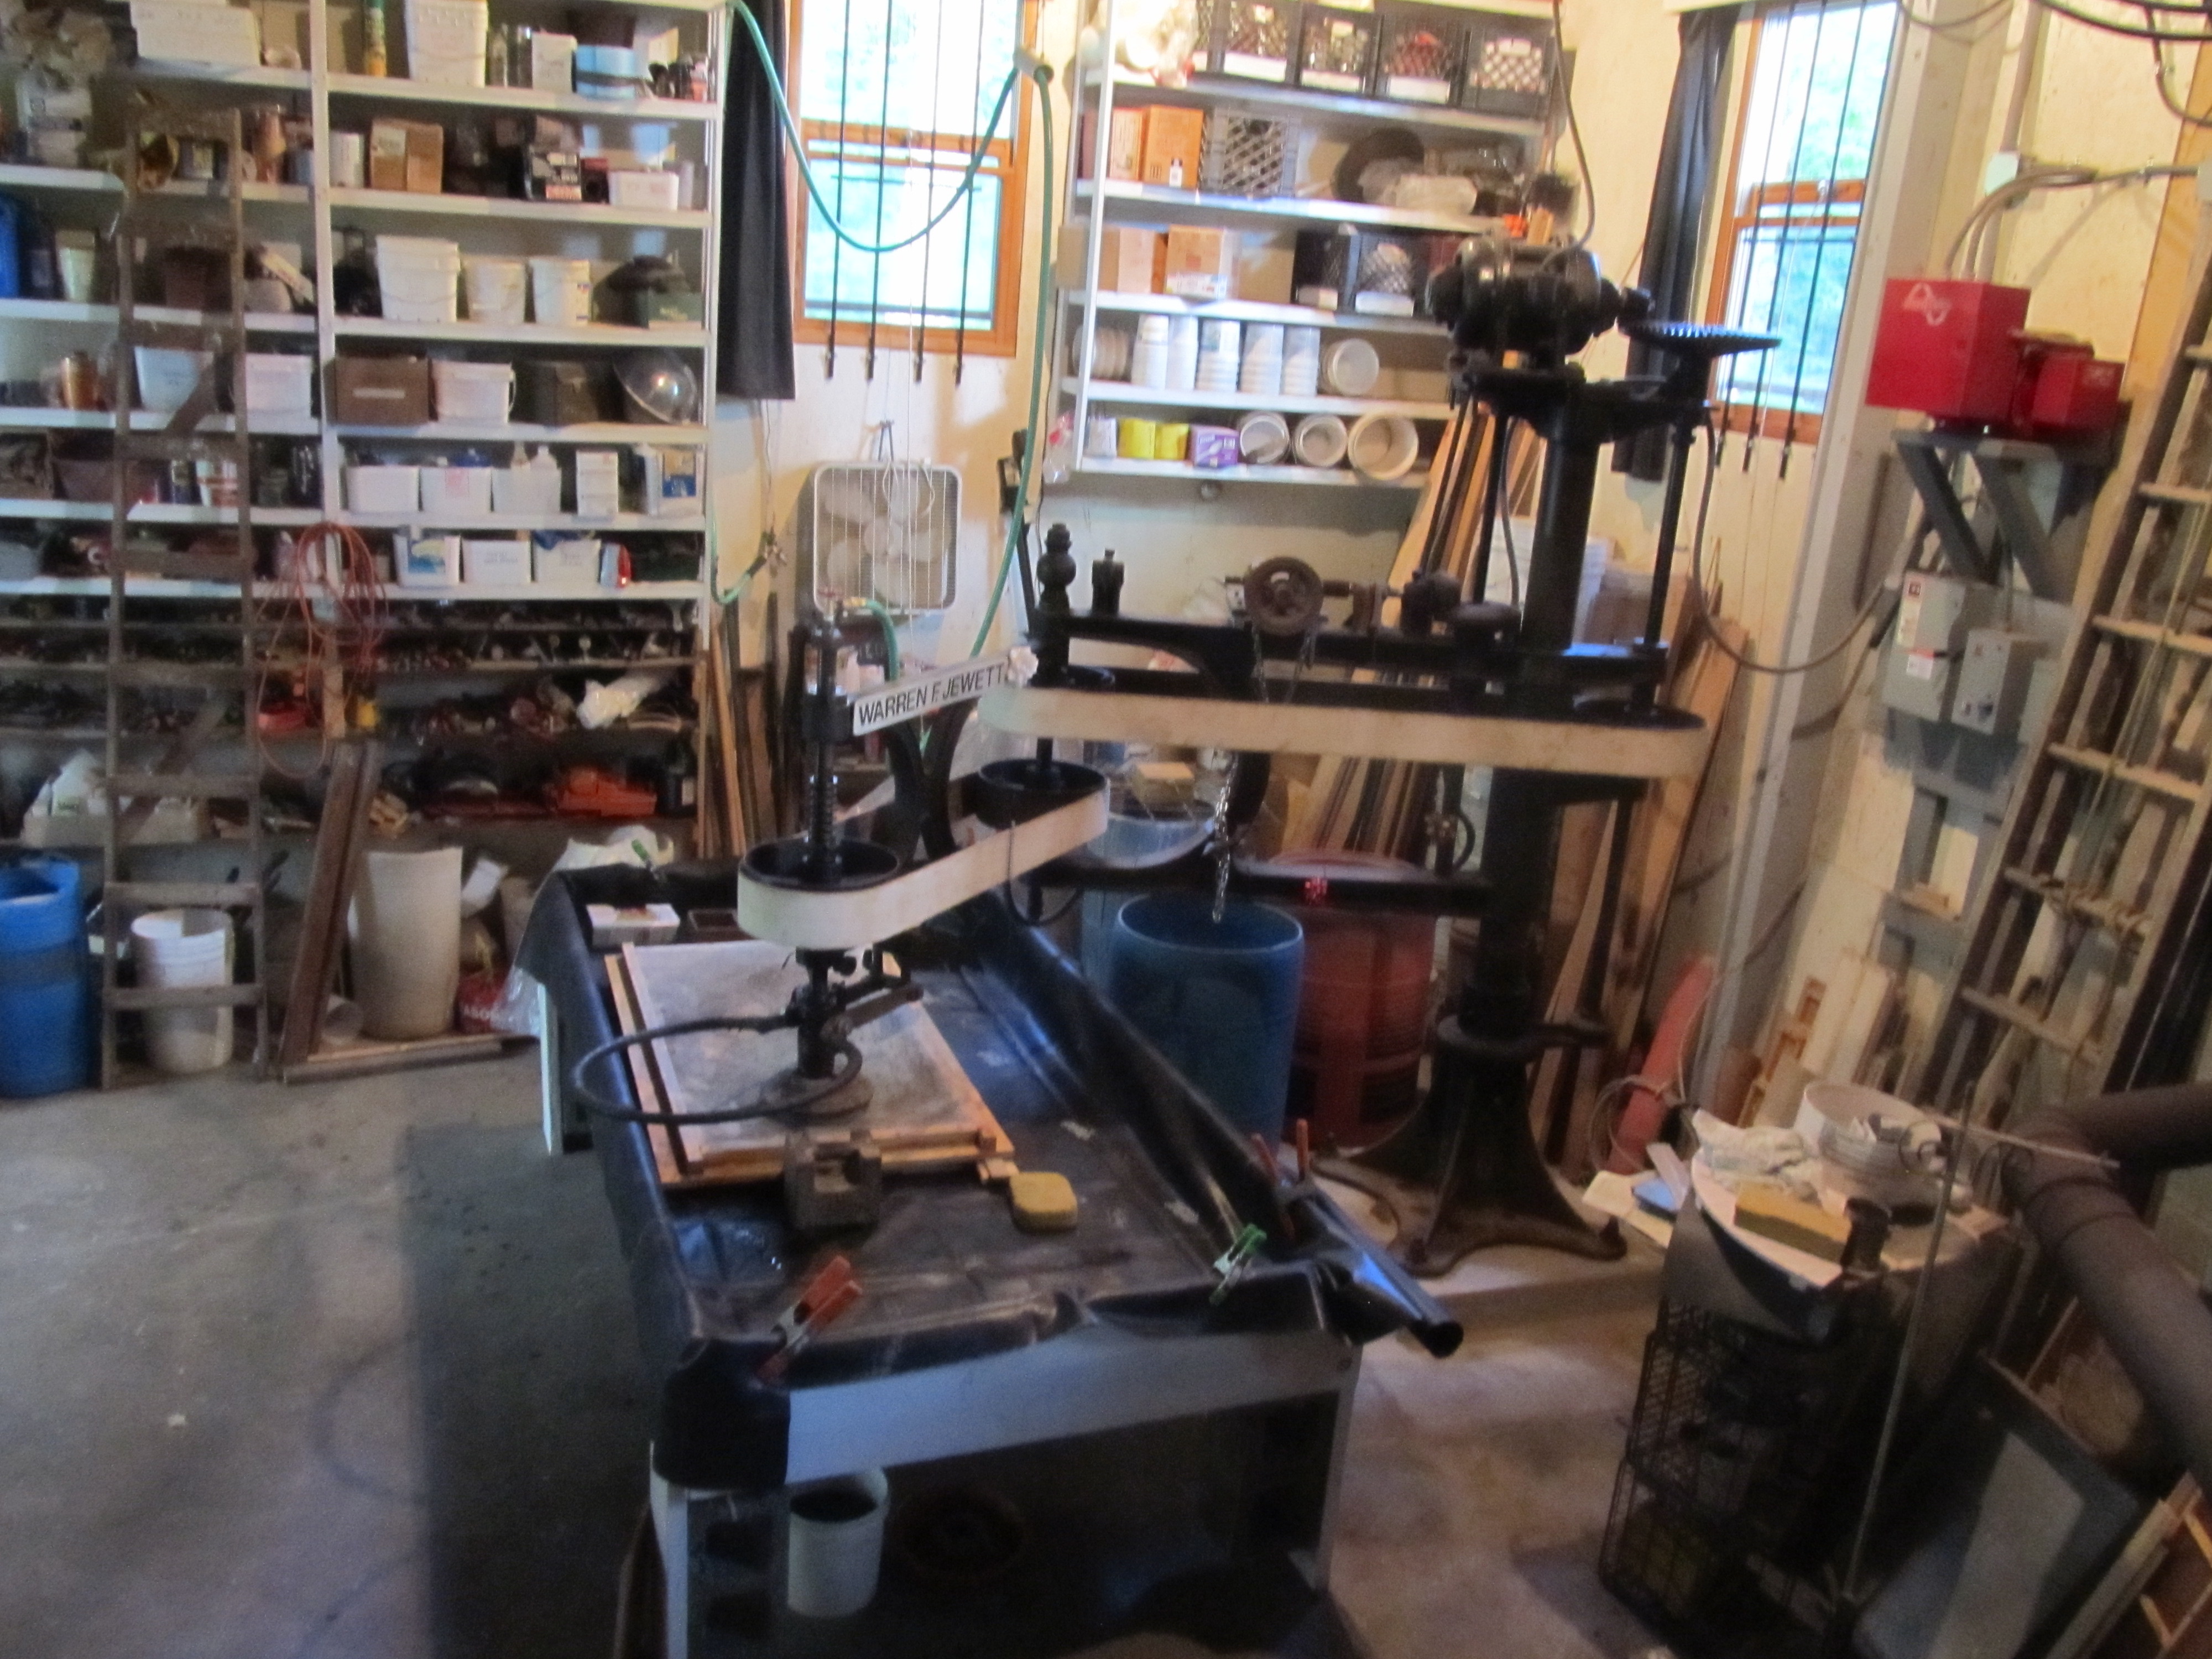
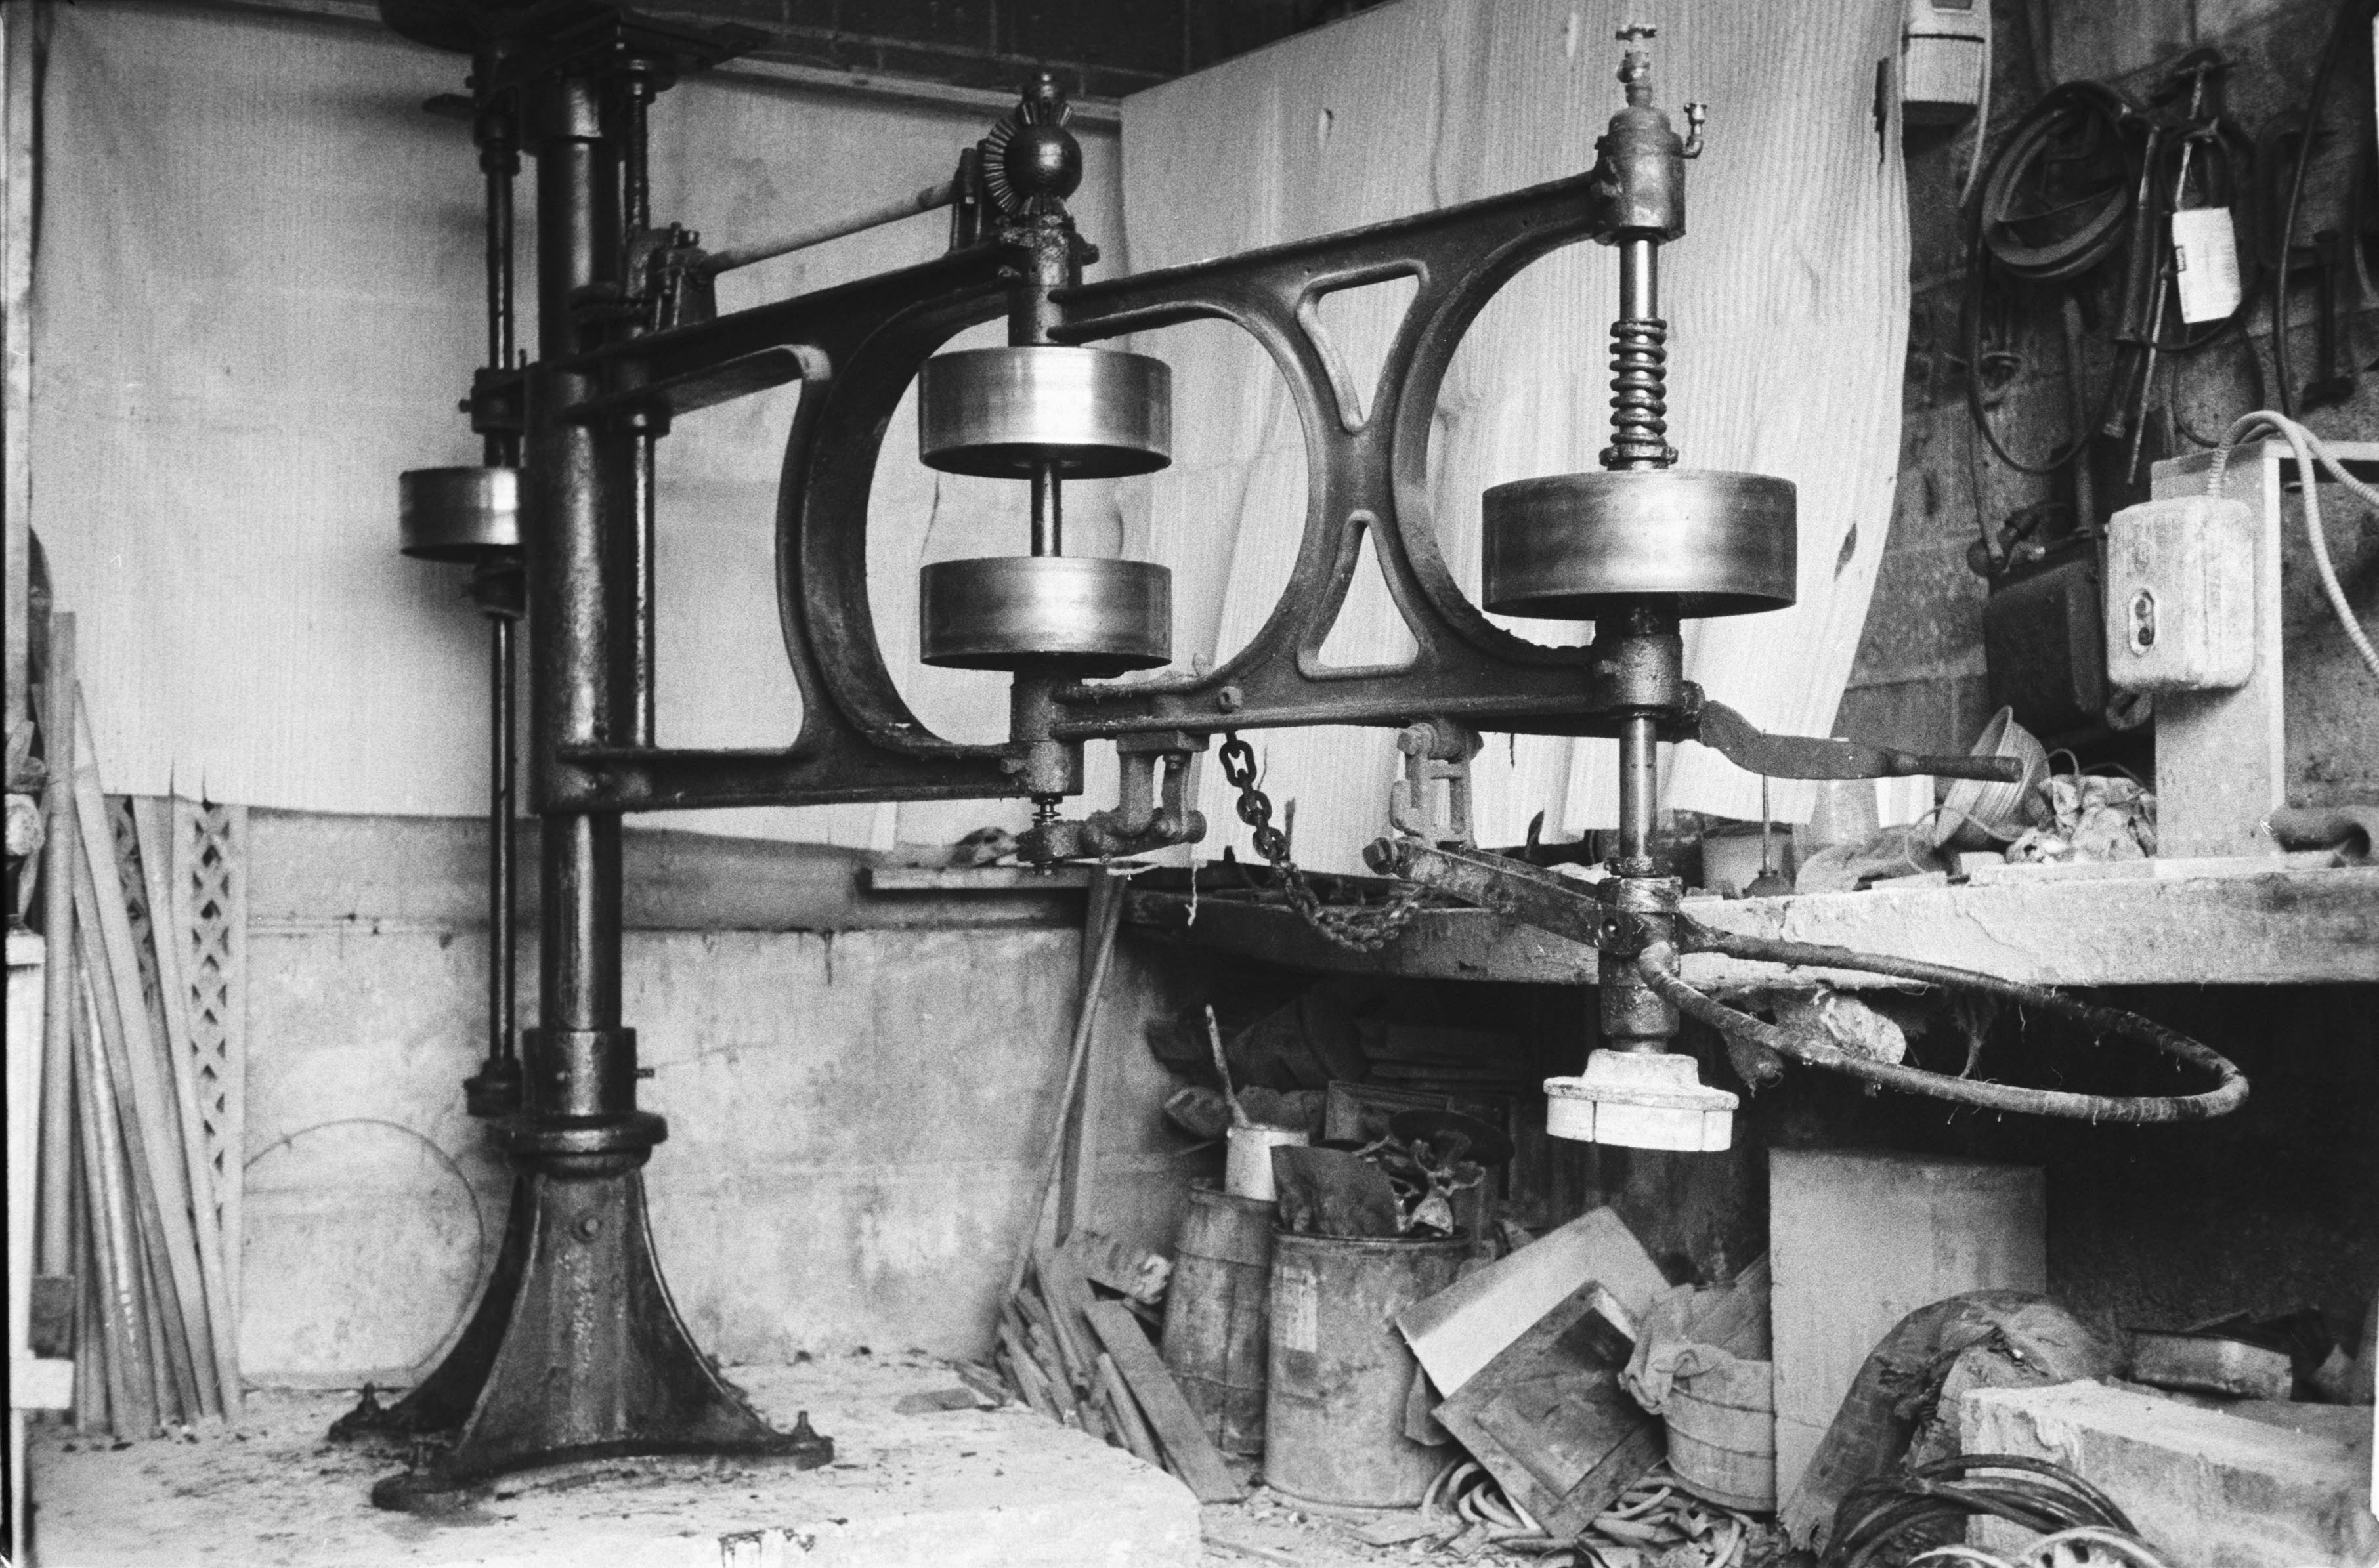
Presiding over Stanley’s smallish workshop was the commanding presence of his radial arm polisher, a stone grinding machine. A huge cast iron affair, it stood about ten feet tall and its long leather belt-driven arm had a 16-foot sweep. It was made in 1912 by the Patch Company in Rutland, VT. It had a monster 220-volt three-phase General Electric Motor made in Schenectady, NY that sat on top and turned a large cogwheel. The gear at the end of the motor’s spindle that drove the transmission was made of alternating stars of leather and bronze. This provided some give when starting up cold. I had never seen that before or since. The machine was telescoped onto, and rotated around a large stanchion that ended in a huge base flange that was bolted into what Stanley told me was a giant cube of reinforced concrete. At the end of the polisher’s long arm was a fitting that accepted the various grit twist-on grinding heads. These had a center hole to allow water to come down through the machine itself and centrifugally wash away the dust produced, creating slurry. The business end of the grinding head was a steel plate that had fittings to accept the five silicon carbide grit segments that formed a star pattern. The steel plate, or “iron,” is heated cherry red, then flake shellac is dropped onto this. Next the segments are placed into the fittings and are thus attached. Connected to the end of the machine is the large circular steel operator’s ring to control the grind. There were lots of fittings for greasing the machine, which was fairly caked with grease, both old and new.
I brought a terrazzo piece to Stan’s. He put it on his inclined grinding bed, leveled the piece, then showed me how to operate the beast. He put a hill of quartz beach sand on the terrazzo, then put the machine over this with a 24-grit head. He opened the water valve on top, adjusted the flow then switched the machine on. The sand was very effective at scratching up the terrazzo. I appreciated how grinding with beach sand was an ancient technique from a couple of millennia back. Stan showed me how to throw the next hill of sand under the grinding head without turning the machine off. I mastered this but don’t recommend it, as it is too dramatic. I think he did this because it was a chore just to start and stop the polisher. The on/off switch was in a box near the wall, so you had to start and stop grinding near there. It was a little tricky to control the machine with one arm while you groped for the switch with the other. Later, there would times when I was fatigued and had to desperately try to hit the off button before an arm cramped. If this were my machine, I thought, I’d rewire the switch close to the operator’s ring on the machine.
 So you rough grind with sand in this manner until you can see that you have ground halfway through the thickness of the aggregates in your casting, and they are well exposed. You then thoroughly wash the terrazzo and the grinding head to remove absolutely all grits, then continue grinding with the silicon carbide 24-grit head with no sand. You change heads and go up through grits to 600-grit, always squeegeeing off the water to assess the terrazzo dry to see if you have removed all scratches from the previous grade of grit. Lastly, you put on the mop and polish with polishing powder.
I could see that as much work as it was to grind with this powerful machine, it was easier than the way I was then grinding, which was to use terrazzo floor equipment. And before that, starting in 1979, I ground with a handheld grindstone, a sponge and bucket of water and elbow grease, if you can believe that.
So it went on like this for a couple of years. I was able to cast designs that were larger in size, grind them at Stanley’s, and pay his landlord, who operated an adjacent pipe-lining business.
But things were changing in College Point, Queens. There were new residential and commercial developments popping up. Industry was slowly disappearing… (to be continued)
The Story Behind the Vase Table
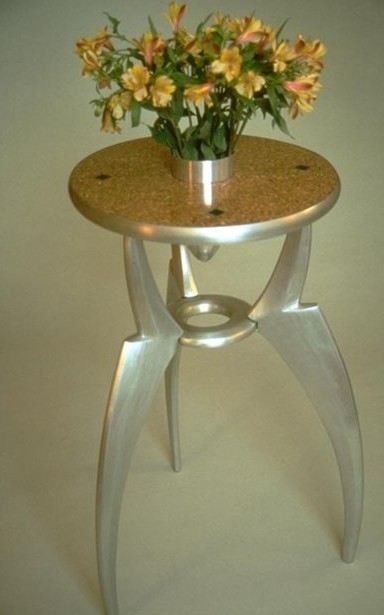
Vase Table
The Vase Table was a breakthrough for me in combining other industrial processes together with terrazzo. These processes were aluminum spinning and aluminum sand casting. I had little knowledge of these processes prior to designing the Vase Table.
I made the Vase Table in 1994. The circular terrazzo top is 19-1/2 inches in diameter, enclosed by a polished spun aluminum rim. The terrazzo is divided into quadrants by aluminum cloissons, or divider strips. Each cloisson includes an aluminum diamond that is filled, intarsia-like, with green marble. The polished terrazzo is crushed Italian Rosso Verona marble, in an earth-red cement matrix. The center of the table has a four-inch hole to accommodate the tapered and polished aluminum vase that penetrates it.
The substantial base is a tripod made of solid cast aluminum. Each leg is nicely proportioned with shapely curves, attached to a central ring. The whole base was ground and polished by hand prior to being assembled and welded together.
In 1993 I learned of a metal spinning operation located in Long Island City, Queens, called Gem Metal Spinning and Stamping. I visited them. The first signs of gentrification of this manufacturing area were starting to appear. Twenty years later, there are many super-block luxury high-rise buildings adjacent to Gem Metal’s location, which is now closed.
My first visit to Gem Metal showed a sizeable and well-equipped plant that looked forlorn and vacant. Its owner, Steve, inherited the factory from his parents, who presided over its now-vanished industrial heyday. The holloware they produced was used as components for the lighting industry. Their peak was decades before my appearance. Steve grew up in the business and was just trying to hang on and meet costs. He told me he hoped to sell out to a real estate developer. He kept a skeleton crew and did small, limited-run jobs for designers like me. A sizeable locker room and huge industrial hand washing sink spoke of an earlier workforce of many employees. It was now ghostly.
Steve toured me around, showing me machines and explaining processes. I looked around at samples of spun aluminum shapes and the collection of hardwood forms used to make them. It all looked kitschy and uninteresting, a 1950’s sensibility. I asked to see his garbage. Out back in drums for recycling, I found an aluminum rim and a nicely shaped vase. I placed the vase inside the rim, and voila’ the Vase Table was born. I met Steve’s minimum order for multiples of rims and vases, and set about designing the rest of the Vase Table in earnest.
Aluminum spinning uses a motorized lathe. Circular blanks are cut from sheet stock. The blanks are centered on the motor’s spindle and clamped against the chosen hardwood form. A large harpoon-like tool is levered against the spinning blank and gradually worked into the blank until it conforms to the desired shape. Some grease is used. The same process applies for brass spinning, but brass must be annealed afterwards in an oven.
A fellow designer told me of a foundry in Brooklyn—J&J Bronze and Aluminum Casting on Huron Street. I did not know that they were the last foundry in New York City.
I visited them, and they showed me around and explained their process, sand casting. Essentially I had to carve in wood the patterns I wanted to cast. They had to be made in two pieces that joined together in the middle with dowels so that there would be good registration when casting. They had to be tapered so they could easily separate from the mold.
I sketched a great number of possible base designs until I came up with a leg that I found appealing. I then sculpted several scale-model legs out of extruded polystyrene, before settling on an exquisitely shaped leg. Next, the full size two-piece patterns for casting were carved. Lastly, the two-piece ring that would connect the legs in the center was carved. A ring of flat aluminum plate would connect the legs on the top.
I brought my patterns back to the foundry, which was humming with activity. They attached the patterns to a plywood match plate which would be pressed into the special sand they used for casting. The sand was in two halves of a rigid flask which was later bolted together. My patterns were painted with a heat-resistant paint. They added material to provide pathways for the molten metal to flow into the negative spaces created in the mold. This is called the gating system.
J&J’s mold maker added a riser which creates a void to allow extra material that offsets shrinkage during cooling. They added a sprue, the vertical part of the gating system. One end connects to the pouring cup where molten metal enters the mold; and the other end connects the runners to the gates which control the flow of molten metal.
After casting, I collected my order. The castings had a rough texture and were not at all smooth. Some fine amounts of metal came out at the seams. This was called flash, which they cut off with a band saw.
I ground the castings on a drum sander using increasingly finer grits until they were smooth and polished. I made a jig to clamp the three legs and center ring in position, and then had them welded together.
The Vase Table is a tribute to vanishing New York industries–and a design I will always be proud of.

