
THE ICFF and ME
NYC’s International Contemporary Furniture Fair (ICFF) started out small in Hall 1E at the Javits Center in 1989. I attended, and loved its vibrant energy. Exhibitors were funky artists and studio furniture makers, just like me. I immediately signed on for the May 1990 show. I will assert that I, and my mostly vanished early cohort, are responsible for growing that nascent show into the sprawling design juggernaut that it became. We did this by simply creating cutting edge furniture and exhibiting it at every ICFF while the show built momentum throughout the 1990s. The Greater New York design community also loved this new local show. I was rewarded with terrific clients. Huge commissions from RAM Stern Architects; all tables and bartops for the still-extant Comfort Diner (214 E 45 St.); numerous terrazzo countertops, custom tabletops, vanities, tiles and cladding for small to midsize area companies. My own art furniture sold. Guggenheim Museum hired me to restore their historic spiraling terrazzo floors, a ten-year gig. Throughout the 1990s, it was a wonderful show for me. I exhibited at ICFF most recently in 2025 at their 35th edition and my 18th appearance there. The show’s focus has shifted to young designers and design schools. As a veteran exhibitor, I felt out of place. Shrinkflation has arrived. I bought floor space in 1990 at $17/square foot for a 4-day show, and in 2025 I paid $85/square foot for a 3-day show. As of this writing, ICFF has been sold for a second time. They will move the 2027 show dates from exquisite May to frigid mid-November, a possibly fatal mistake. I hope the show survives.
Creating the Guilloche Console


I spend my New York winters studying design. Fifteen years ago, I saw an intriguing pattern in a book. It was “Historic Ornament,” by J Ward (1897). The pattern was this classic Greco-Roman guilloche motif, taken from a church in Venice, Italy.
I pasted the image on a bulletin board and subsconsciously viewed it over the years, while it brewed inside me.

In Spring 2024, in preparation for the ICFF, I decided to create this Venetian pattern in Venetian terrazzo, as a console. What follows is a pictorial chronicle of the many steps in the design and fabrication of this dignified piece.
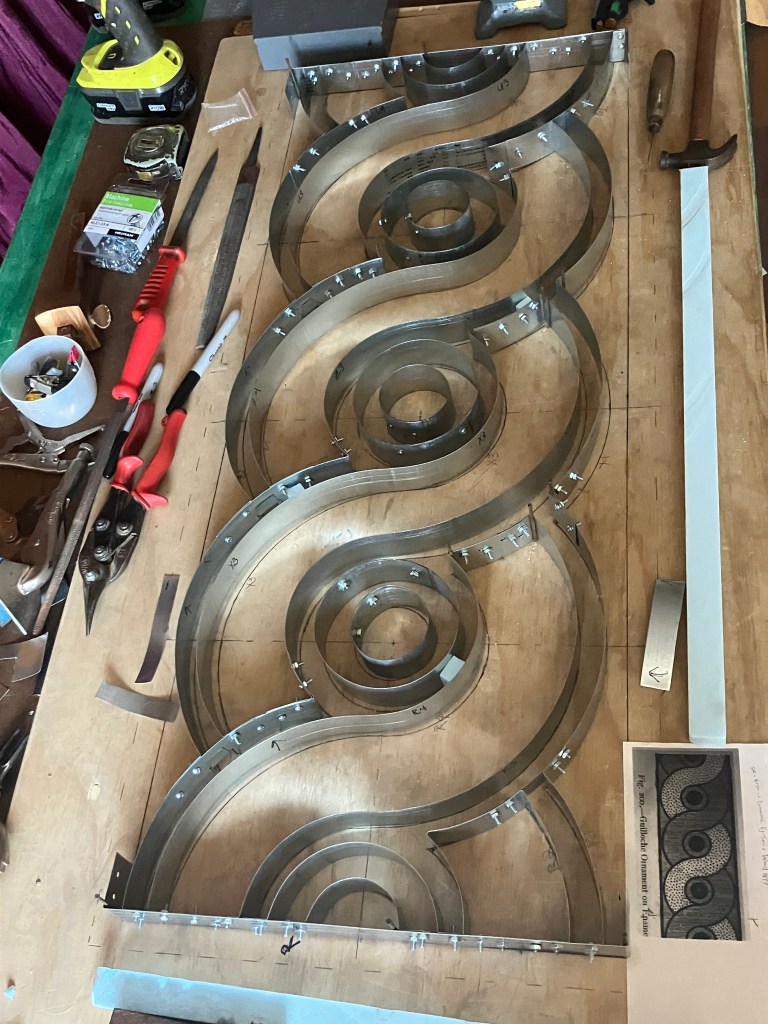
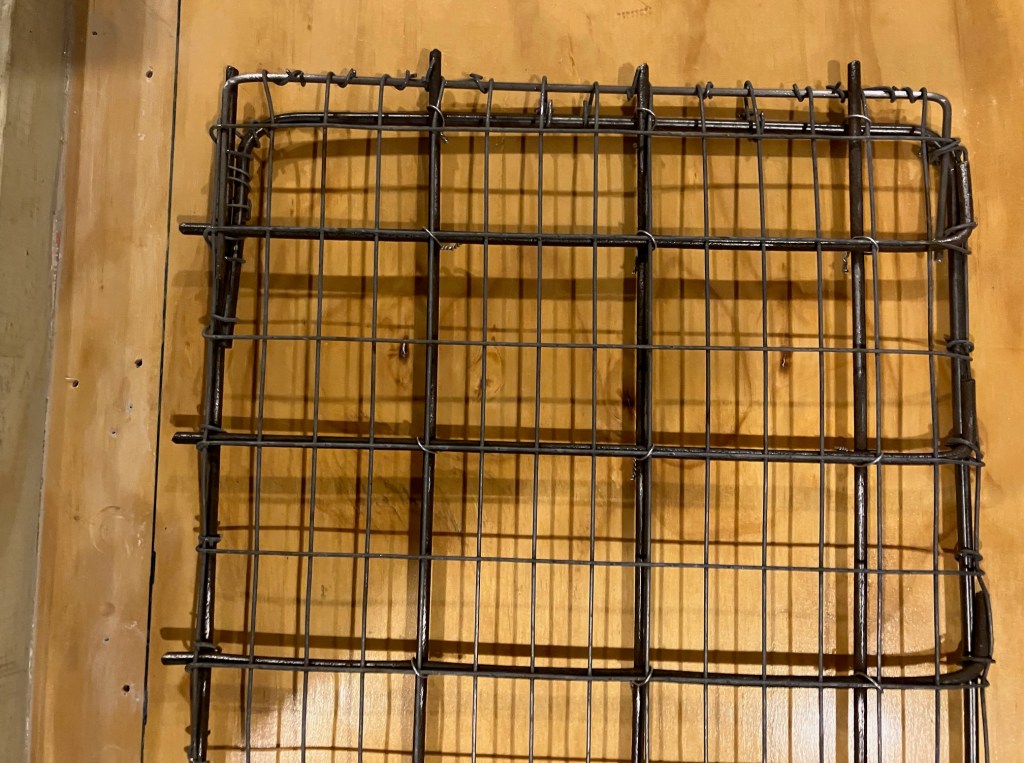
After laying out the full-scale pattern on paper, comes sheet metal fabrication, as seen here in my workshop (left).
Using 1-1/2 inch strips of galvanized sheet metal, I am forming circles using my slip roll. All elements will be cold connected using stove bolts and threaded rods. This mould is essentially a cookie cutter that will help me to “print” an image. Metal fabrication is one of the hidden skills within precast terrazzo.
The pattern can also be created in brass cloisonne’ strip, for embedding within the piece. The finished mould should conform to the drawing, of course.
Here is an image of the finished mould (right).

Next step is to think about the colors of the cement matrices and the marble varieties. Here are some color studies done to help with design decisions (left).
The color samples are done to lock in the mineral pigment recipes and to ensure good contrast between bordering fields of terrazzo.
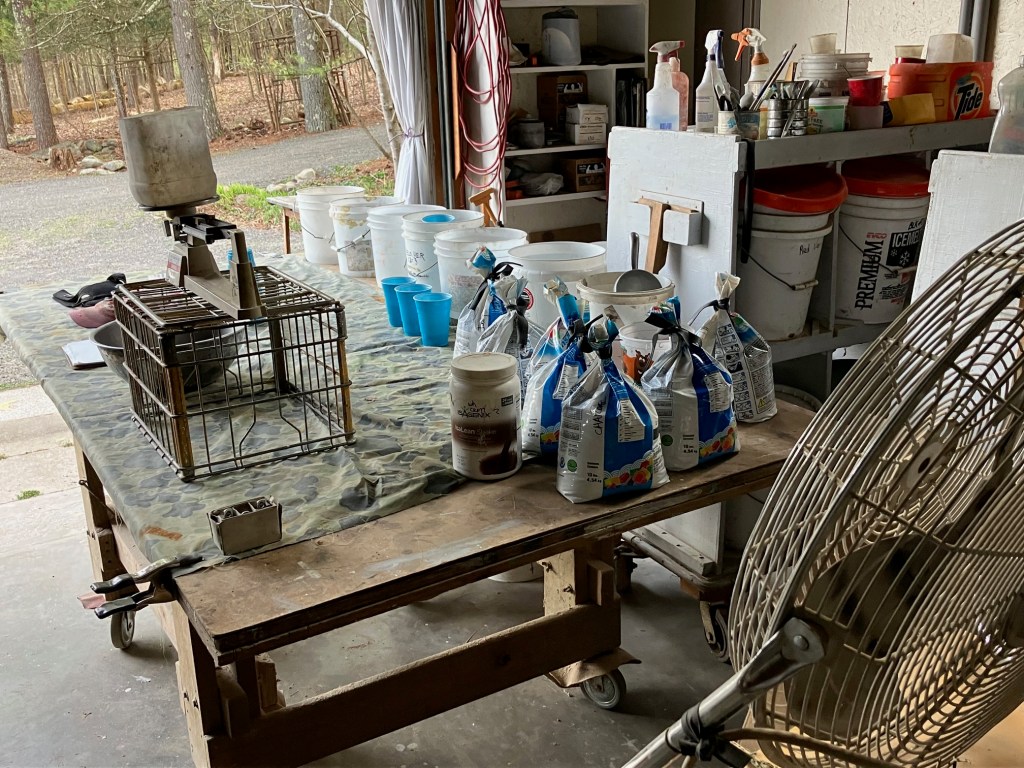
Creating cement colors is quite tedious. All pigments are naturally occurring minerals, and must be proportioned and weighed as dry powders along with the white or gray portland cements. All sample combinations are weighed and recorded dry on a triple-beam balance scale, measured to the gram. This is a dusty process.

The powders are forced through a fine brass sieve then mixed (left). This ensures a consistent color.
The samples are then cast. Twenty samples were cast for this (right).

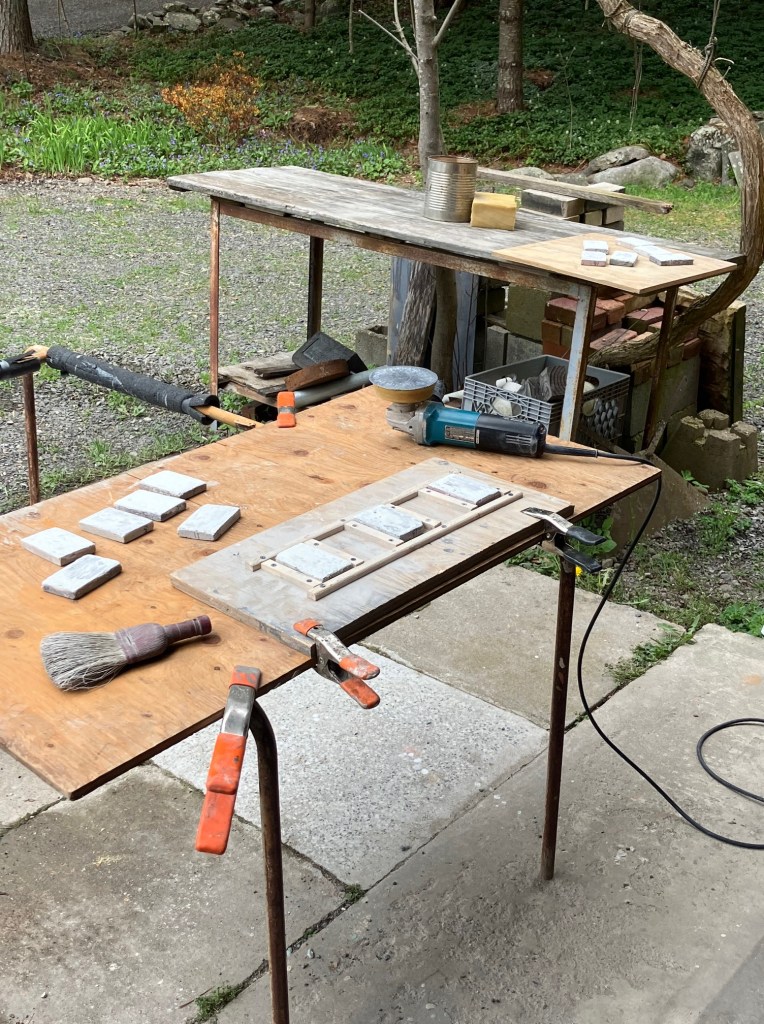
As with all terrazzo, the samples must be coarsely ground down, grouted with matching color cement matrix, then finely ground down to assess the actual color combinations.
This takes several days for each round of samples.

The samples are done and ready to be assessed (left).

After selecting final colors, the cement matrices are mixed according to sample recipes and put into sealed pails and are labeled.
Next step is to select and blend the sizes of the various colored marble aggregates. These are placed into pails as well.
The steel reinforcement is next prepared.
Strength here is critical, as the terrazzo piece must be strong for one or several lifetimes of use, but especially to resist the extreme pressures of aggressive machine grinding.

Casting the Guilloche Console is now imminent. Masonry tools are laid out (left).
The Guilloche mould is made fast within the form (below).

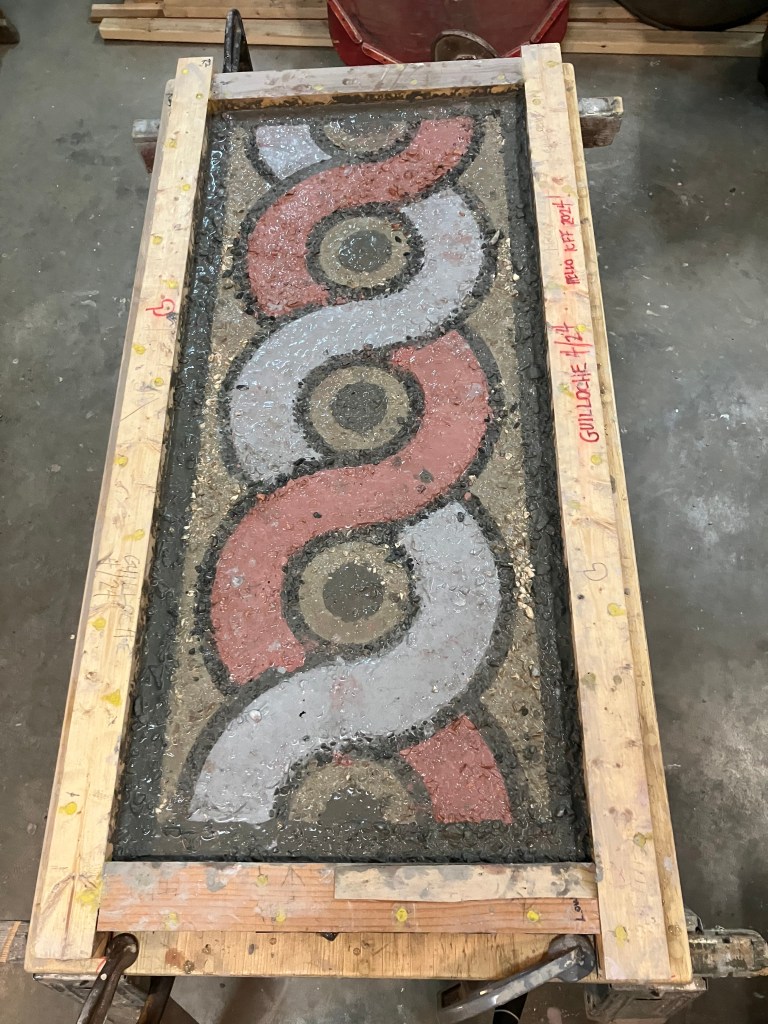
The various wet terrazzo mixes are placed and finally the mould is carefully removed, leaving this mosaic “print.” (left) The piece is damp cured for several days and then allowed to dry out completely over several more days.
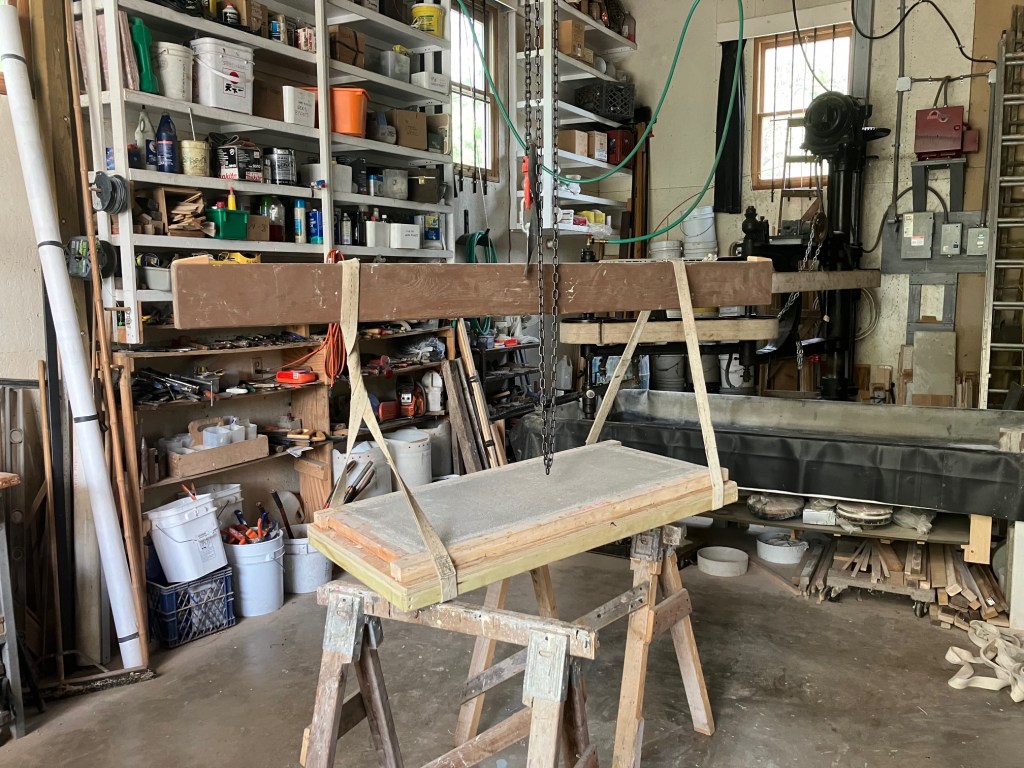
It is time to move the piece to our large, leather belt-driven overarm polisher that dates from 1913 (above).

First the back is ground flat (left). Next, the terrazzo face is thoroughly ground down (below).


After rough grinding, all mosaic areas must be masked and grouted with corresponding colors (left).
Next day, the grout is ground off with a fine stone and the whole piece is then finely honed. The piece is lastly polished to a bright, reflective finish (right).
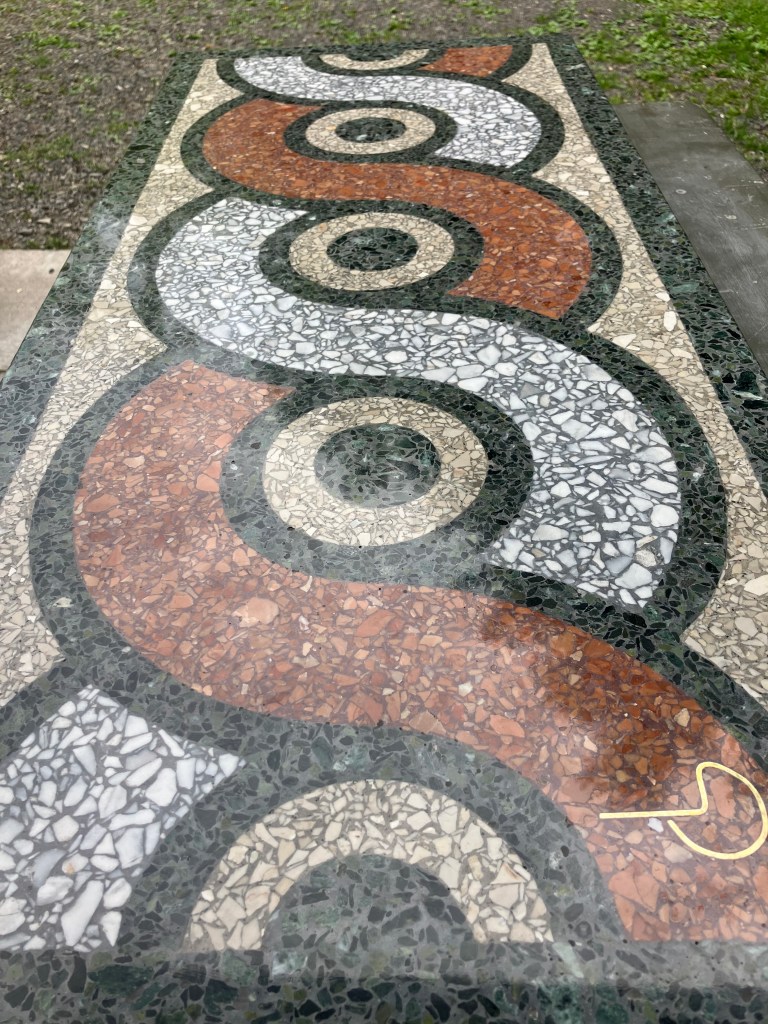
As the preceding reveals, there is a great deal of preparation and many steps involved in this work. The Guilloche Console is a highly designed and researched piece of art furniture, with strong Greco-Roman references. It is made from the classic natural mosaic materials of stone and cement, along with respectful assiduous craftsmanship.
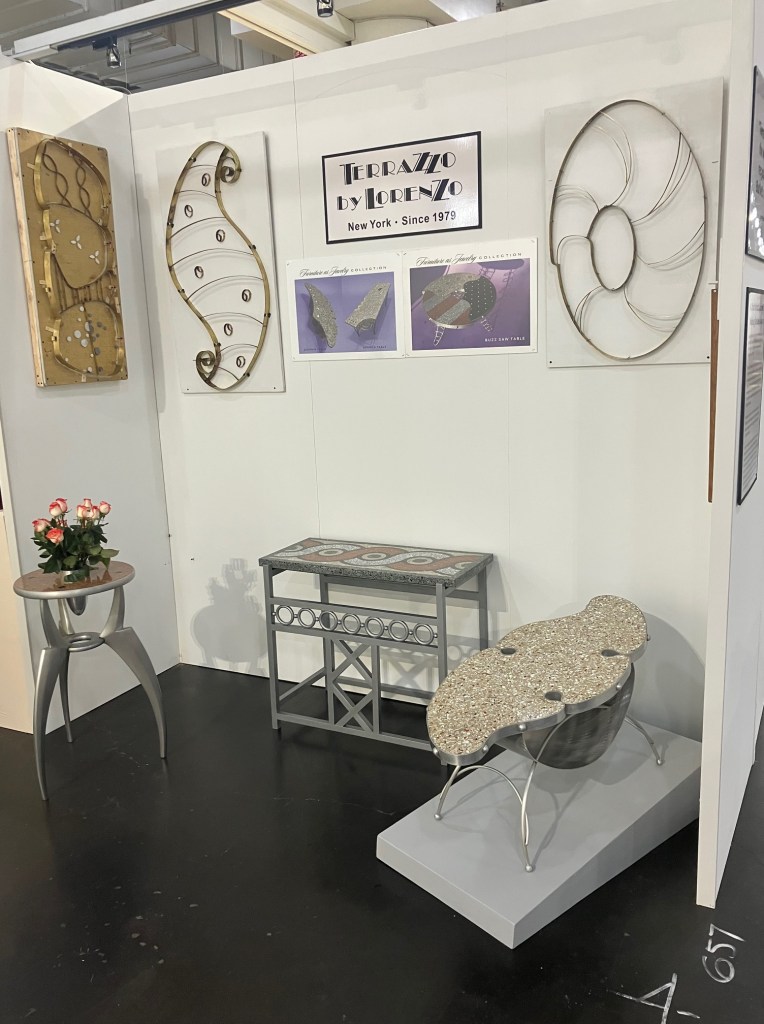
The Guilloche Console was created in April 2024. It had its debut the very next month at the ICFF show at the Javits Center in New York City. Since our first appearance at the ICFF in 1990, this is our 18th exhibit at this show. It is the nation’s largest design trade fair, which began in 1989. This our 46th year of terrazzo artisanry.
My Work at the Guggenheim Museum in NYC
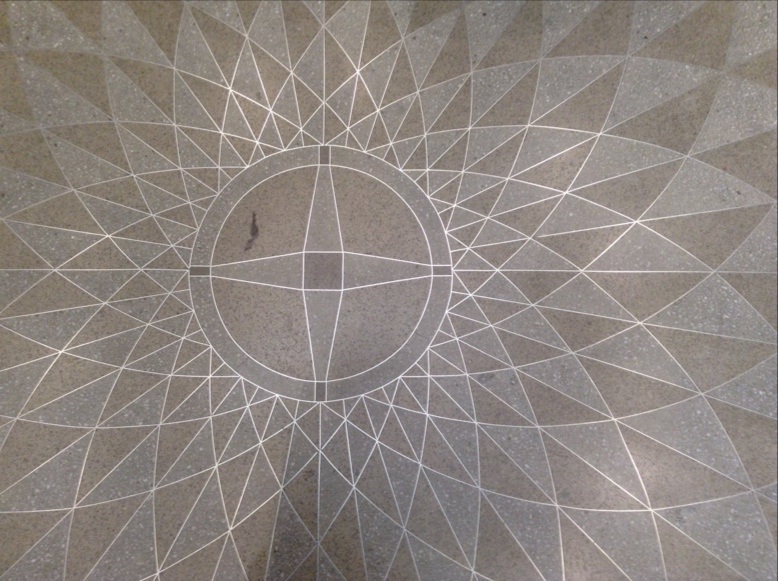
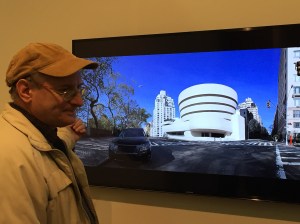 What’s on exhibit lately at the Guggenheim Museum? Well, amongst other things, it’s me. I’m typically on view for a week or two during the short interval between shows known as the changeover period. Now in my third year there, I am kept busy restoring/repairing the museum’s iconic spiraling terrazzo floors. How did this occur?
I was exhibiting my latest terrazzo furniture designs at NYC’s International Contemporary Furniture Fair (ICFF) as I do every May (this month will be my 17th show there). Into my booth came the facilities manager of the Guggenheim. She told me they were having difficulty finding someone in New York to do some terrazzo work for them, and were considering importing someone from Italy. I went to take a look with her.
The Guggenheim Museum is a breathtaking structure, and Frank Lloyd Wright was way out in front of the current trend of sculptural architecture. In addition to the superlative art collections housed within, the building itself is a destination, and it is a major tourist and art lovers attraction. A great deal of money has been spent in recent years to restore the museum, especially the exterior—and the structure looks great. The terrazzo floor, however, needed a little TLC. Some patching had been done over the years, but it was of variable quality. What I like about the staff I have met is that they genuinely care about this historic structure, and seek to maintain or improve it.
 I effected some initial terrazzo repairs and they liked my work. They agreed to pay my hourly rate, and so I came on board.
Terrazzo restoration is quite different than the pre-cast terrazzo that I have specialized in since 1979. A lot of what I do at the museum is essentially oversized dental work. The parallels between tools and technique are striking. As is the material being restored—teeth are largely composed of calcium and marble terrazzo chips are calcium carbonate. I also perform extractions.
Partly because of the slope of the floors, some of the art work and constructed exhibits are mechanically bolted to the terrazzo floors and attached with anchors. A typical anchor repair involves wet boring around the anchor with the smallest diameter of a variety of hollow-core diamond bits. Depth is one-half inch. The plug containing the anchor is extracted. The new bore (or cavity) is cleaned, then filled with a matching terrazzo mix. The new plug is cast just proud of the surface, and after hardening, it is ground down to grade. Next step is grouting the patch with the colored cement matrix to fill in any small voids. Lastly, the hardened grout is fine-ground to 120 grit.
Some of my technology for this work is beguilingly simple. My wet-drilling jig is made of two one-by-twelve boards with pre-bored holes for each diamond bit diameter. This helps me drill perpendicular to the floor. I prefer to grind the hardened new terrazzo plug dry. I fashioned a grinding shroud from a cardboard box with a hole for a vacuum cleaner hose. Dust control is important.
I have performed hundreds of these repairs, and a good repair will blend in and not distract from the art. I now have a collection of extracted anchors. It’s kind of like a personal hurt locker. Tapcons, lag shields, plastic anchors, wedge anchors, even antique looking fiber plugs I have never seen before.
Different tasks are presented often enough to make things interesting: resurfacing a bathroom floor; filling in the valve boxes for Frank Lloyd Wright’s original hydronic radiant heat floor system; or the present assignment of filling in the voids of the ornamental stainless steel grates in the main entrance with a black terrazzo mix. These grates, which surround the large bronze dedication medallion at the museum’s entrance, collect dirt and catch the occasional stiletto heel. Filling in the voids should remediate the situation.
The museum is an exciting place to work. Shows are planned three years in advance and all exhibits and installations are highly orchestrated. Teams of specialized carpenters, plasterers, painters, and art wranglers unbuild and build new installations within tight timelines. These people are generally talented and well educated. Many have art backgrounds. I had no idea of the huge amount of work that is done between shows. They practically construct a new museum inside for each show, then re-plaster and repaint the whole place. I particularly enjoyed watching the multi-story oval aluminum superstructure erected for the James Turrell show.
An unexpected occurrence has been how often museum personnel have approached me, introduced themselves, and told me with some sincerity how much they appreciate the work I do. From the museum director, department heads, and on through museum guides, many have thanked me and expressed their desire that I stay on. This is altogether pleasant, and the recognition is gratifying.
So do come to the Guggenheim Museum and see a show. It’s worth your while. Come look for my work. I’ll be pleased if you can’t find it.
South Beach Terrazzo and Architecture Tour
The following are highlights of my recent visit to the historic Art Deco district in Miami Beach, Florida, also known as South Beach. Photos are organized into two sections: Terrazzo and Architecture.
TERRAZZO
 Larios on the Beach (Ocean Drive). This dazzling terrazzo tile floor certainly caught my eye. It features an aggregate mix of crushed seashells, blue sea glass, and cross sections of spiraling nautilus seashells in a neutral gray matrix. If I were assigned to create these rectangular tiles, I would cast blocks of solid terrazzo with the above aggregate and matrix mix, and include whole spiral seashells in the mold. Later I would run a diamond saw blade through the block and slice off tile-thickness rectangular slabs. That’s how to get the cross sections. The highly designed interior is replete with polished, stunning terrazzo surfaces. I just had to inquire who owned this fabulous restaurant. The answer: The seven-time Grammy award-winning Gloria Estefan and her husband Emilio, who designed the space. (left)
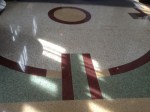
A richly patterned geometric terrazzo design in the former Chase Federal Savings & Loan Bank. Now a Banana Republic and very tastefully repurposed. I sense that this striking floor is probably a relatively recent installation. (right)

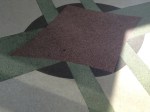
An exquisite geometric-patterned terrazzo hotel lobby floor in excellent condition with a bright polish. Wearing quite well… (left)
-

- Simplified compass rose on exterior porch with inlaid lettering
-
- Terrazzo lobby.
-
- Simple geometric overlay.
-

- Geometric overlay with inlaid lettering.
ARCHITECTURE

Marlin Hotel
The Marlin Hotel is a typical Miami Beach Art Deco gem. Smallish in size, it features a “Rule of Three” Deco façade with ornamental relief work depicting sub-aquatic marine life. The ornamental friezes are painted in “Tropical Deco” pastel colors. There is geometrically-patterned terrazzo flooring both in and outside. The corners of the building are rounded in “Streamline” style. Concrete “eyebrows” projected over windows provide shade. The perimeter of the façade is framed in blue neon lighting–very striking at night.

Better seen in the next image are the decorative steel railings featuring wave patterns and portholes or seafoam (your choice). Also note the use of native coral wall cladding and Deco wall sconces. (right)

This structure, awaiting renovation, shows a simple formula for elegance on what is basically an inexpensive flat white stucco façade. Two vertical pilasters connected by a decorative steel railing that sits on an “eyebrow”; a line of ornamental relief squares above the second story windows; and a scalloped cornice. One can of lime-proof pastel blue paint highlights all relief elements. Simple, elegant, and relatively inexpensive to create. (left)
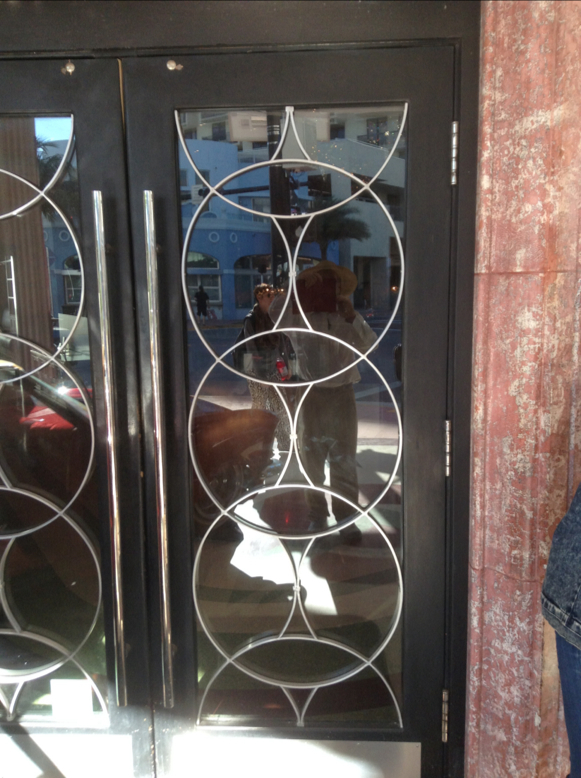
Door grille using geometric patterns (think portholes). Interior terrazzo floor visible through glass. That’s me taking this picture in the reflection. (left)
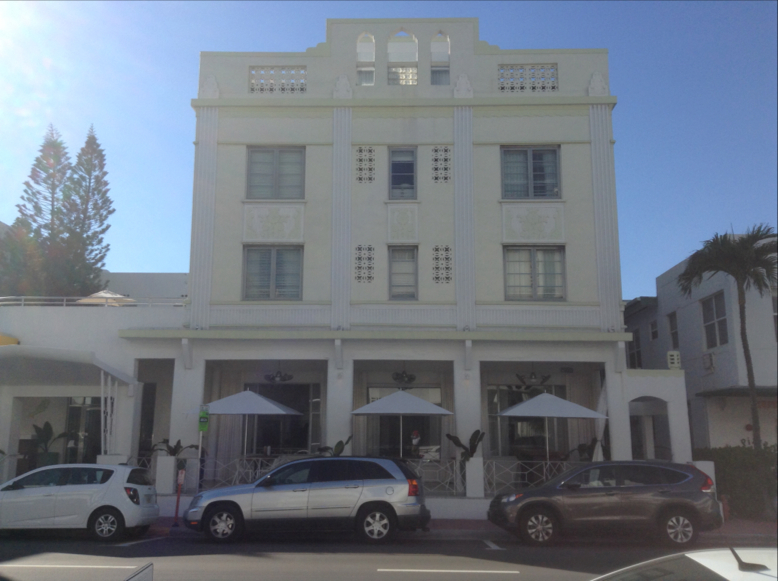
Note use of perforated decorative concrete block for ventilation in center, as well as truncated “campanile” style pediment that is reminiscent of the Alamo in San Antonio, Texas. (right)
-

- The Carlton Hotel.
-

- Another exquisite railing with nautical themes.
-

- “Wedding cake”

The vacant Greystone Hotel was recently sold for $7.5 million.
This recent visit was a delicious appetizer. I now have some questions that seek answers. Who were the artisans who installed these acres of colorful, decorative terrazzo? (We are kindred spirits.) Where did they come from? Italy? The Caribbean? (I myself, for example, learned to do terrazzo in Puerto Rico.) Was there some cross pollination between the Art Deco architecture in nearby Havana, Cuba and Miami Beach? This does seem apparent to me.
I will be exploring all this in the future. I look forward to my next visit to this exciting tropical locale.
Terrazzo Heaven: Miami Beach Historic Art Deco District
Marlin Hotel
I passed through Miami Beach in 1976 on my way to a 7-month trip through Central America. I had no particular interest in terrazzo until 1978. All I remember of Miami Beach was lots of aged retirees, many of whom were Jewish New Yorkers. The area looked somewhat bedraggled.
Years later, I became aware of the Miami Beach Art Deco District and the important part that terrazzo played in it. I designed and cast the Crescent Table in 1988 as my homage to this Tropical Art Deco. For this piece I employed a derivative tropical pastel color palette.
Fast forward to February 2015. On a recent trip to Florida, my wife and I did a detour to Miami Beach to see the historic Art Deco district and to look for terrazzo in particular.
We didn’t have to look hard. Terrazzo was everywhere, both inside and outside buildings, and replete with ornamental design.
It was all quite exciting. The Art Deco style buildings, many designed as hotels, had been restored and looked great. I ran from place to place, feeling mildly ecstatic, and took pictures. Many buildings were surprisingly small by today’s standards and were human scale. They were like so many gems, each perfect in their own unique design.
We located the Miami Design Preservation League, an outfit that is largely responsible for the preservation and restoration of this unique national treasure. They had books on the architectural history of Miami Beach. Looking through their indices, I saw no listings under terrazzo whatsoever. This is an egregious omission, in my opinion, and fairly typical as far as architectural books go. Similarly, in my research for this article, there was a dearth of online information about the ubiquitous decorative terrazzo in this historic district. We terrazzo people are largely undocumented, and I’m not talking about immigration.
The purpose of this blog is to start to tell some of these terrazzo backstories, including my own.
Speaking of backstories, I think it’s time for a bit of history on Miami Beach and the historic Art Deco area, sometimes called South Beach.
The most prominent character in the history of Miami Beach was the flamboyant Carl Fisher. Fisher became a millionaire from creating the first bright automobile headlights. He also created the Indianapolis Motor Speedway.
On a trip to Florida in 1913, Fisher came across the barrier island of Miami Beach, which was then an undeveloped mangrove swamp. He envisioned a vacation destination for rich Northeners, along the lines of New Jersey’s Atlantic City. He provided the money to finish the bridge started by John Collins, that would connect it to the city of Miami. In its day, it was the longest wooden bridge in the world. In exchange, he received some of the real estate that Collins owned.
Fisher physically created Miami Beach. He cut down the vegetation, dredged up sand, and dumped it down to create flat acreage and additional acreage as landfill. He brought in topsoil from the Everglades and replanted this new environment.
Carl Fisher was quite clever at promoting his holdings, and soon Miami Beach was the place to go. Affluent Americans came and built fabulous homes on his land. All this promotion helped contribute to the Florida land boom of the mid 1920s, which featured a lot of speculation and unscrupulous practices by hucksters. Fisher made money, but in 1926, a hurricane leveled everything and shook his finances . With the crash of 1929, Fisher began to fade from view.
Around this time, many people moved to Miami Beach, including a robust population of Jews. Due to restrictive covenants, Jews were not permitted to live north of South Beach. Many of them started building small hotels in South Beach, and chose the Art Deco style, which was very popular at that time. The most prolific architects building in this idiom were Henry Hohauser and L. Murray Dickson. They used hurricane-proof materials such as concrete block, stucco, concrete and glass block. Hundreds of these structures were built.
By the 1970s these Deco buildings were aging and some buildings of historic value were being knocked down. A preservation effort was led by Barbara Capitman, and the Miami Design Preservation League was formed. The Art Deco district was put on the National Register of Historic Places, and this led to the preservation and restoration of this architecturally significant area.
Today there are 960 Art Deco buildings in this district. It is one of the areas with the most Art Deco buildings in the world, rivalled only by the elegant Art Deco apartment buildings on the Grand Concourse in the Bronx, New York City, very near where I grew up.
What characterizes Miami Beach’s Tropical Art Deco architecture? These are masonry structures devised to resist tropical storms. Typically, there is the “Rule of Three”—a strong central element, flanked on either side by two similar structures. This creates a pleasing geometry. The buildings have what is sometimes called “the wedding cake” look. This includes the “icing” in the form of decorative relief friezes, usually made of stucco on the exterior. Glass block is a another distinctive element, as is the use of neon lights, which create a colorful and magical nightscape.
 Tropical pastel colors are used, such as flamingo pink, seafoam green and turquoise, the color of the Caribbean Sea. In theory, these light colors were used to reflect some of the tropical heat. Another passive cooling element in these pre-air conditioning days were the “eyebrows” or concrete projections above windows that provided shade. Perforated decorative concrete block was used for ventilation as well. Also typical is the abundant use of colorful terrazzo flooring, often featuring bold geometric designs, both inside the buildings, as well as outside on their entry porches. The address or the name of the building may also be inlaid in the terrazzo.
Another strong theme is the “nautical” element. This is a seaside community, so the reference seems obvious. However, some of the most elegant Art Deco designs of the time were on the interiors of the luxurious trans-Atlantic ocean liners and reappear in the architecture. Porthole elements are common, and ornate metal railings evoke the ship’s railings.
Many of these buildings are just a few stories, so that elevators would not be a necessity.
Stay tuned for my next blog featuring a South Beach Art Deco tour, which is divided into two sections—Terrazzo and Architecture.
The World’s Largest Map
 The world’s largest map is made out of colorful terrazzo. It appeared in the New York State Pavilion’s Tent of Tomorrow at the 1964 World’s Fair. This month marks the 50th Anniversary of that map and the World’s Fair.
I grew up in the Bronx, NY and, as a kid, visited the 1964 New York World’s Fair. Long before my long affair with terrazzo, the colorful terrazzo roadmap at the NY State Pavilion completely captured my imagination. Here’s that terrazzo story.
Governor Nelson Rockefeller hired architect Philip Johnson to design the NY State Pavilion at the 1964 World’s Fair in Flushing, NY. This was subsequent to Johnson’s design for the State Theater at Lincoln Center, an earlier job done for the State. The Pavilion was the largest structure at the Fair. It consisted of an oval-shaped, open air construction called the Tent of Tomorrow, a circular theater building called Theaterama and three Astro-View towers. The tallest of these towers stood 226 feet high. All of these structures still stand.
The largest structure was the Tent of Tomorrow. This consisted of 16 concrete columns in oval plan, which supported a steel superstructure. One hundred feet up, cables supported multi-colored plexi-glass panels as its roof. The chief attraction at this huge assembly hall, which measured 250 feet x 320 feet, was its vast terrazzo roadmap. The map was 130 feet x 166 feet. It was sponsored by Texaco, the fuel retailing company, which has since been absorbed by Chevron. The terrazzo map showed, in scale, all 54,000 square miles of New York State. A group of Yale students projected a colorful Rand McNally map of New York onto template paper, and they meticulously traced all roads, placed names, and map symbols by hand. They included all Texaco gas station locations. The map consisted of 576 square precast panels, each 4 feet x 4 feet x 2 inches thick. Each weighed about 400 pounds. The cost, in 1964 dollars, was about $1 million.
The templates were sent to the Manhattan American Strip Company in Connecticut. They still exist, but are now in Staley, NC. They laid out all the divider strips and cut out plastic letters and numbers and did all the art work, which was assembled into 4-ft. square marine plywood boxes.
Port Morris Tile and Terrazzo of the Bronx, NY got the call to do the actual terrazzo precast work. The company still exists and does terrazzo work, but their primary focus today is natural stone. In accordance, they have changed their name to Port Morris Tile and Marble.
The terrazzo panels included interlocking hardware on the sides, and suction cups were used to lift them into position. They were bedded on sand over a concrete substrate. The entire map was supposed to be temporary with the idea being that at the end of the Fair, the precast panels would be removed and reassembled at a State building in Albany. This never occurred.
The terrazzo floor map was wildly popular. Six million people visited it. It has been called the first piece of public art to be commissioned.
While the rest of the Fair was demolished, the host New York State and New York City Pavilions were saved. The NYC Pavilion is now the Queens Museum, which still houses the sprawling scale model of New York City. Theaterama has been converted successfully into Queens Theater in the Park (adorably called Q-tip). The other structures have been neglected and ravaged by New York’s severe weather.
After the Fair, the Tent of Tomorrow with its terrazzo roadmap was used as a concert venue, then later as a skating rink, which probably helped degrade the terrazzo. The map was allowed to deteriorate over 50 years with no maintenance and some vandalism.
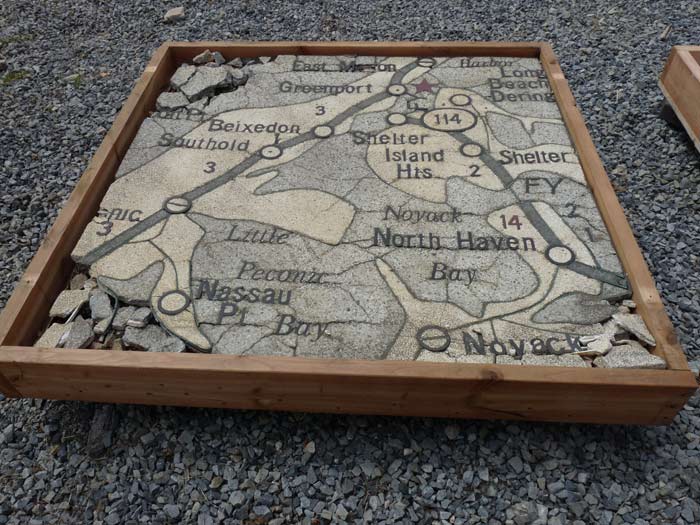
In 2009, students of the University of Pennsylvania program in historic preservation conserved four of the terrazzo panels showing Long Island. Two appeared at a show at the Queens Museum called Back on the Map. Included in the show was the history of terrazzo and the story behind the terrazzo roadmap. The University of Pennsylvania also carefully photographed each remaining terrazzo panel, which shows that the terrazzo is severely degraded.
In an effort to prevent further deterioration, the terrazzo roadmap has now been covered with landscaping cloth with gravel placed on top.
Earlier this year, I contacted a group called People for the Pavilion. They would like to see restoration of the Pavilion and some adaptive reuse of the structures. I offered to give them an opinion on the status of the terrazzo at no charge, but they told me the site was under the control of the Parks Department. One of the group’s founders, Mathew Silva, is close to completing a film on the Pavilion called Modern Ruin, a World’s Fair Pavilion. At present there is a controversy between those who would like to see the hulking neglected structures demolished, and those who want to see restoration, which has been estimated to cost $70 million for all structures. Queensboro president Melinda Katz is in favor of restoration. In the recent past, the Pavilion has been placed on the National Register of Historic Places. This designation does not unilaterally mean that it may not be demolished.
I would still like to view the terrazzo map to give a pro bono opinion as to the possibilities for restoration. But based on the photographs that I’ve seen, I believe it may be too late to restore the world’s largest map in its entirety.
How Lorenzo Got His Polisher – Part 2

An Unexpected Opportunity (see February post for Part 1)
One day, Stan calls me up and says, “Wanna buy the machine? I gotta move out of the shop—they’re selling the property and they want the machine out. You can have it for $300.” It was an incredible opportunity, but I myself was renting a workshop on historic Huguenot Street in New Paltz, NY then, and had no place to put the machine. So I declined Stan’s offer.
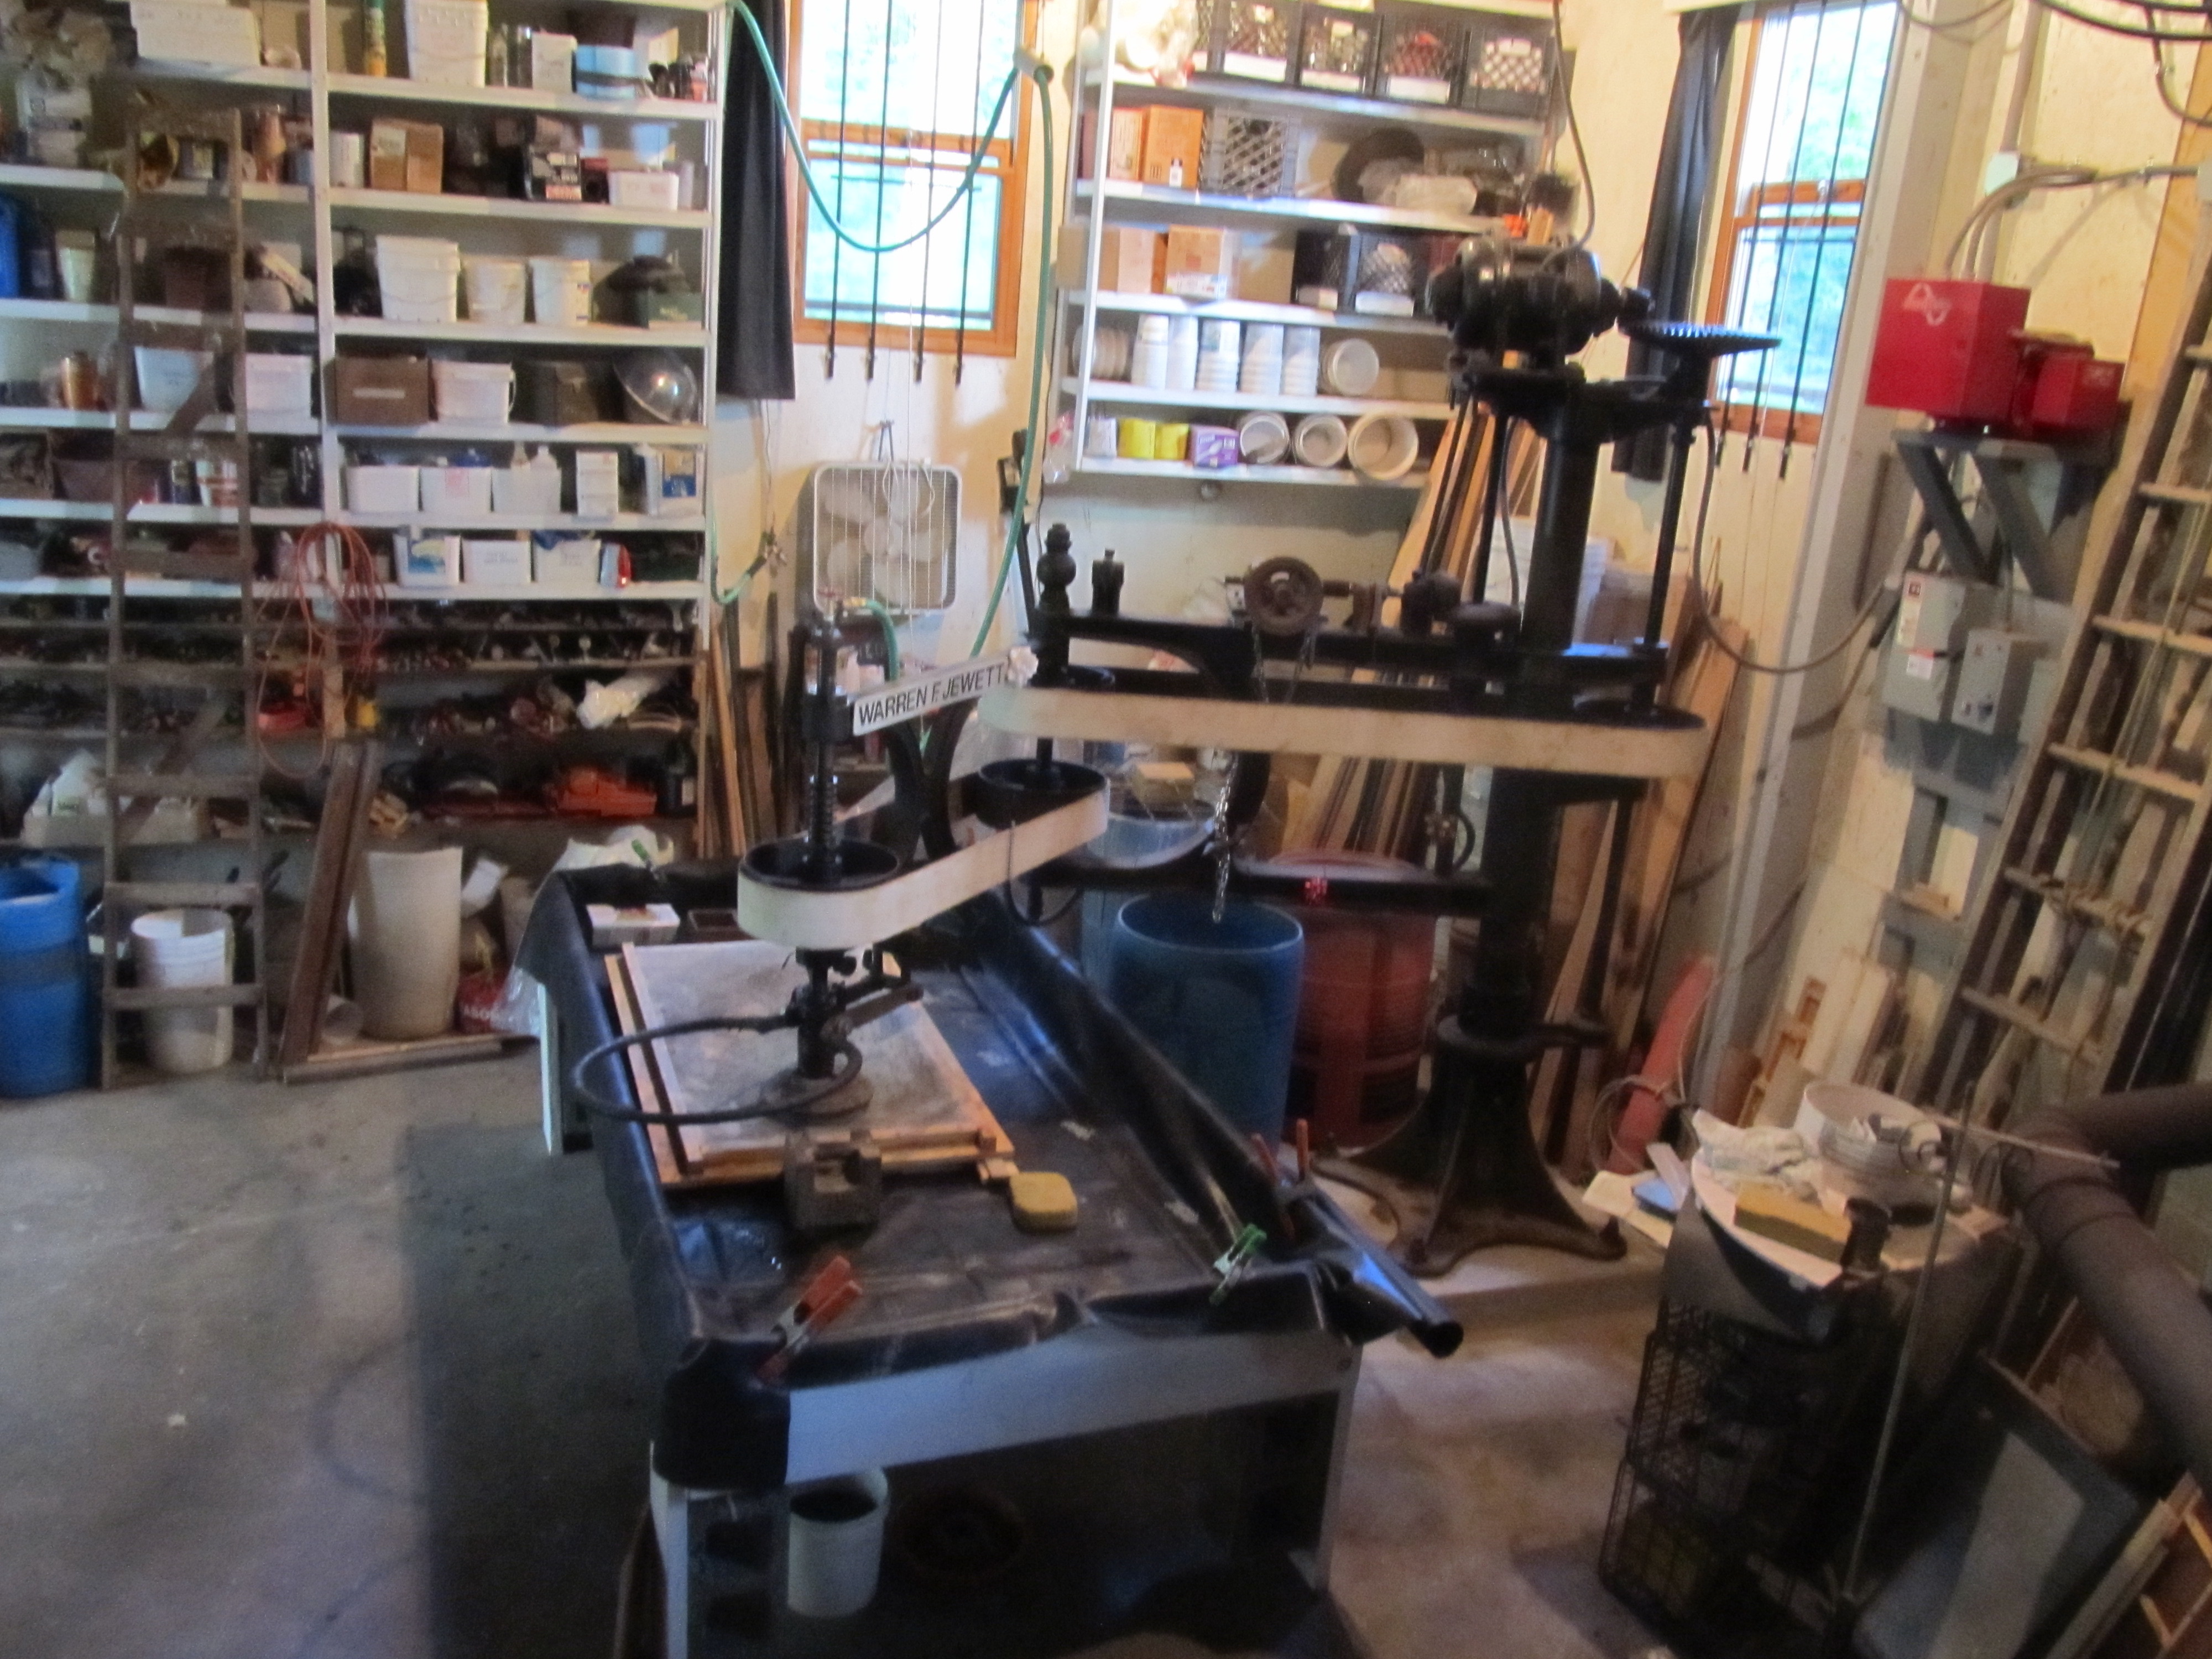
Time passed and I mulled things over. Up in New Paltz, my workshop neighbor was the farmer, Warren Jewett. Warren had given me rent-free use of a large old family cowshed, which I fixed up. That’s where I stored all the terrazzo chips I bought when Zanin closed, and later when Colonna & Co. folded as well. Warren was always so generous and helpful to me.
I wanted that polisher. I knew Warren Jewett would let me store the machine on his property and would help me move it with one of his two powerful tractors. I ran the idea by him, and he agreed as I knew he would.
So the problem was really on the Queens end of things. Next to Stan’s terrazzo shop was a sizeable construction yard, where all kinds of heavy equipment was parked. I asked Stan if he knew anyone there; and as it happened, he was great friends with the yard foreman. I went to speak with the foreman at the yard’s garage, and he was aware of Stan’s situation. I asked, “If I show up here with a flatbed truck, would you help me load Stan’s machine for $200?” With a dismissive wave of his hand, he said, “Sure, no problem.” He wanted to help Stanley out.
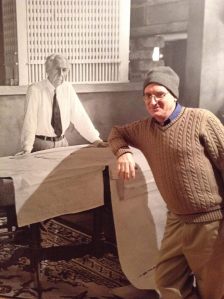
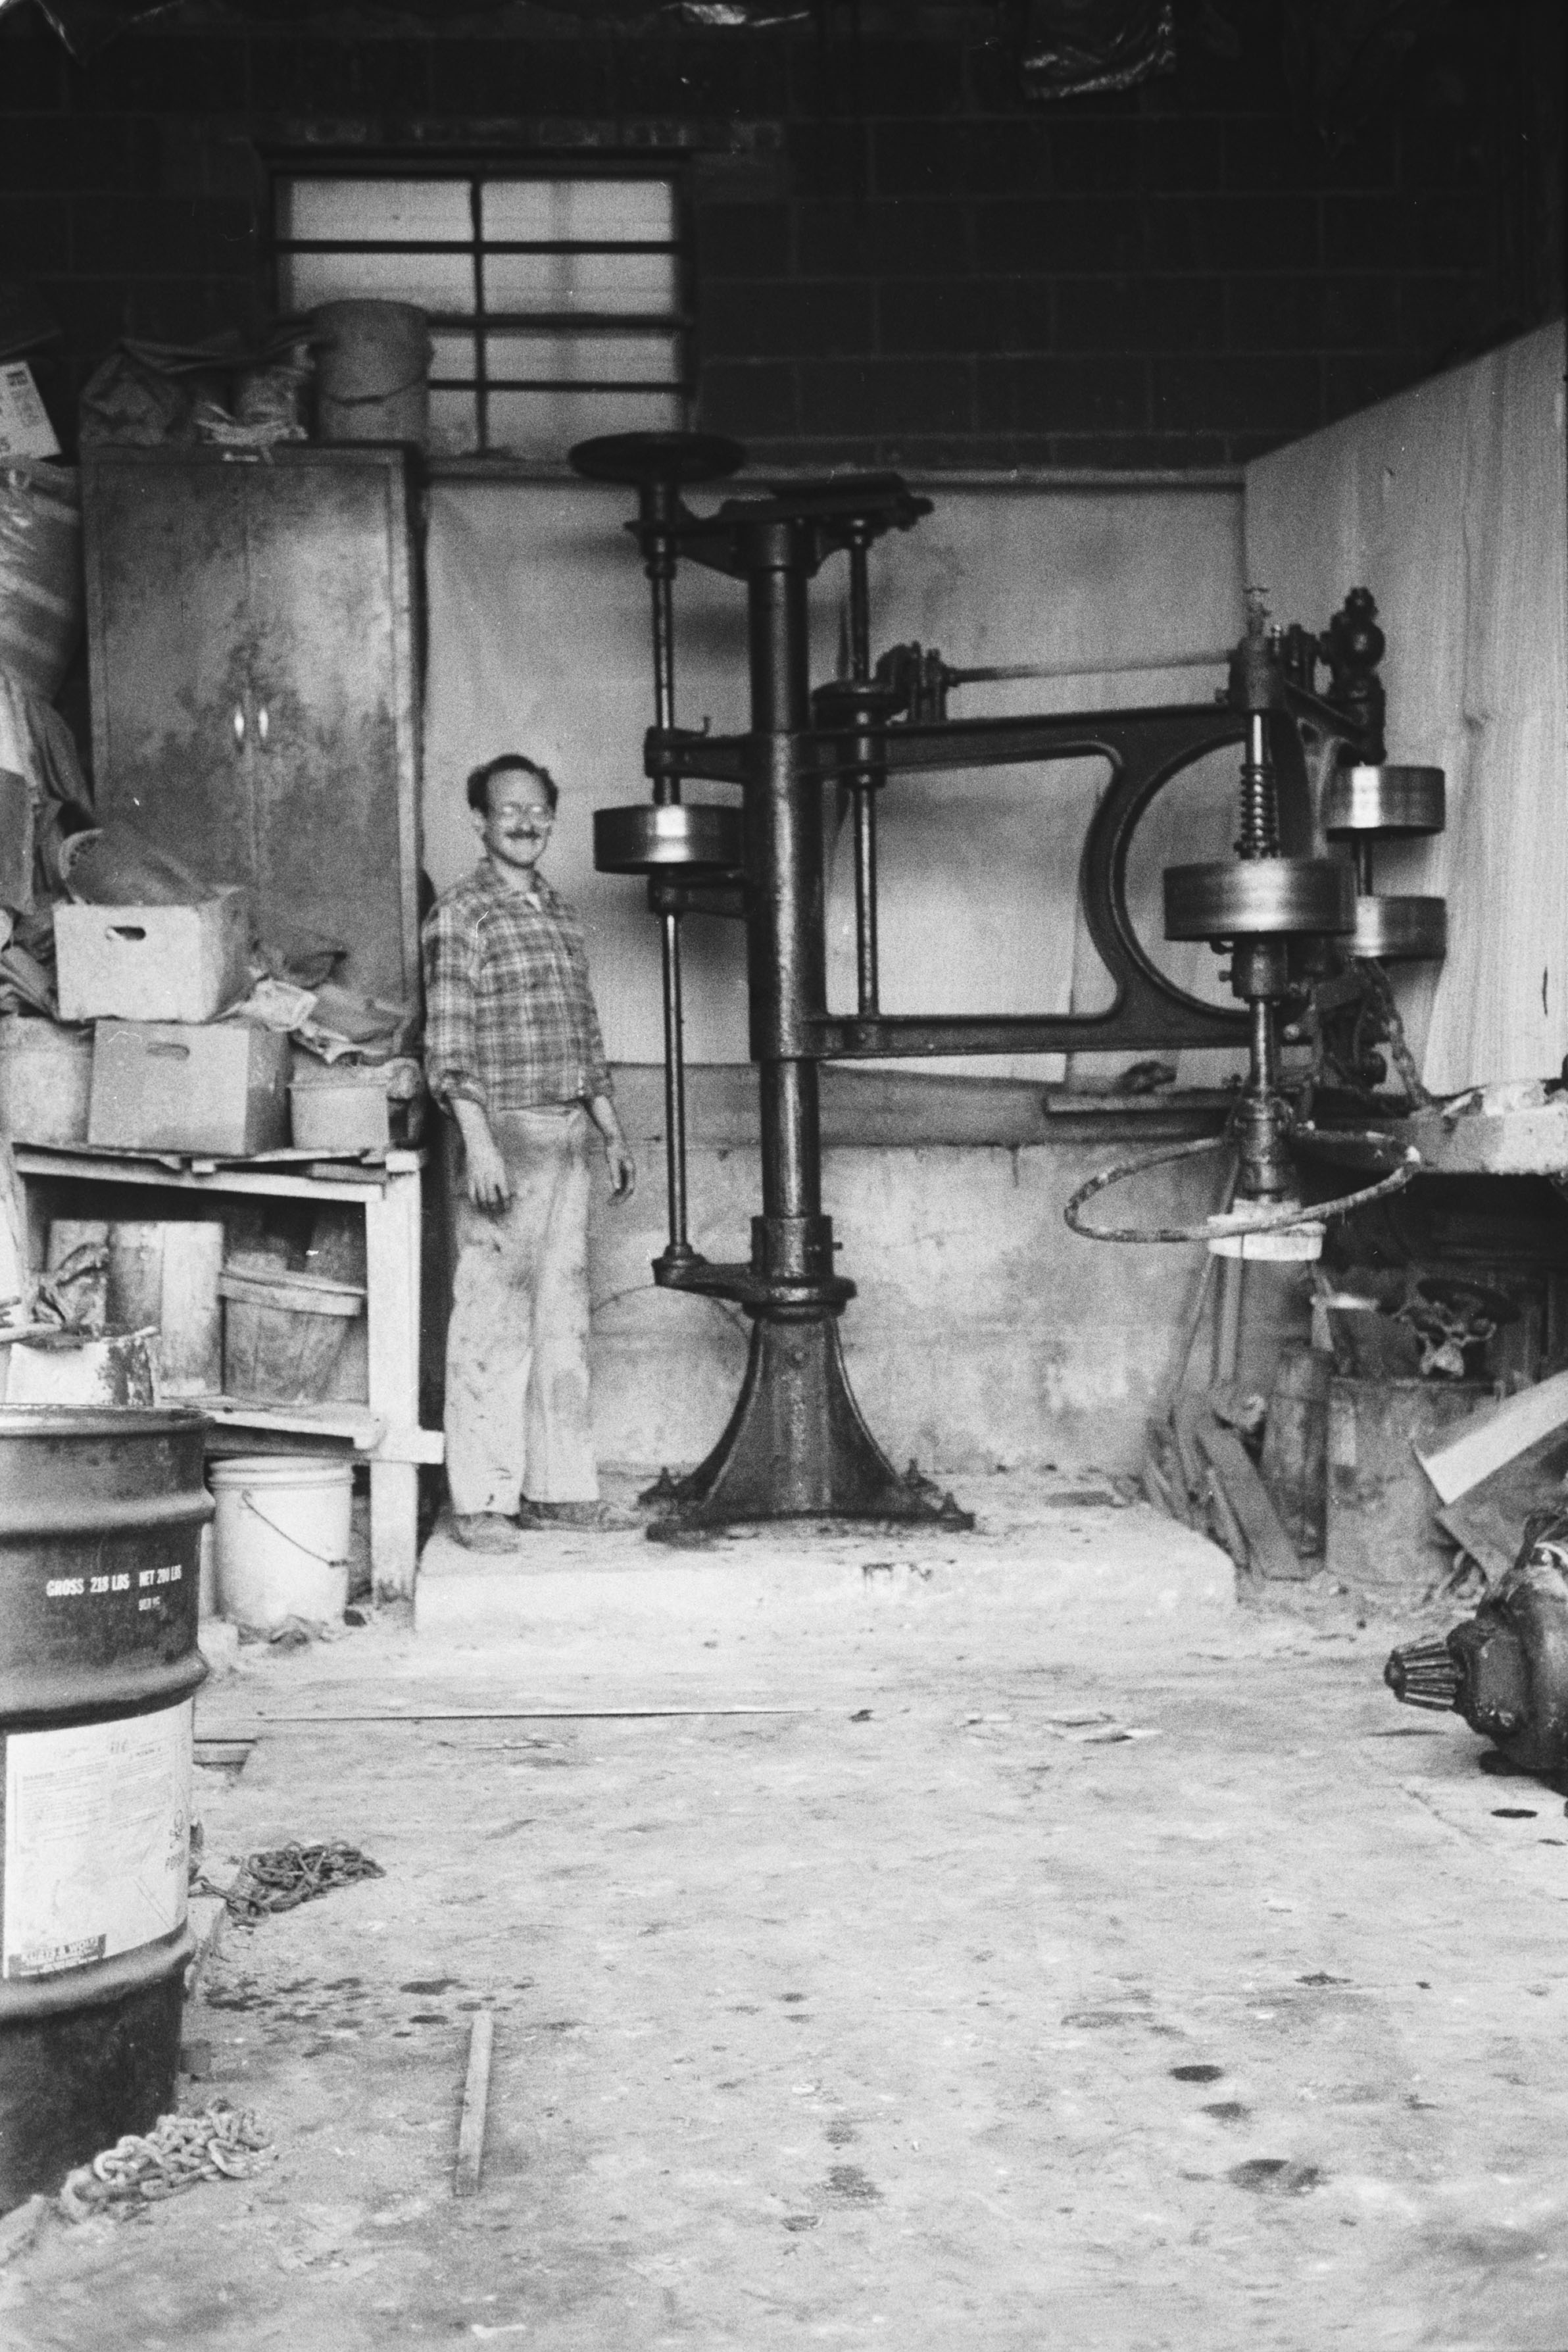
I was thrilled. I had hooked up both ends. I arranged a date for the pickup. Before that, I went several times to Stan’s to scrub the polisher down with kerosene and wire brushes. That’s why I’m filthy in the accompanying black-and-white photo, which was taken in October, 1988. There were decades of grease on that machine.
The day before our appointed Saturday moving date, I went over to see the construction yard foreman. It was Friday after 5pm. I went into the yard’s garage, and there he sat at a makeshift table, presiding over the largest poker game I have ever seen. There was a mountain of cash piled high on the table surrounded by all these construction workers. With my entry, they all froze like rats in a spotlight. I froze, too. The foreman said, “Oh, it’s you—we’re on for tomorrow morning, right?” “Yeah,” I said, and we all let you this huge collective sigh.
Next day, I show up at Stan’s with a large flatbed truck I rented. The yard foreman drives over on a backhoe with a monster wrench. We try to unbolt the machine from its concrete foundation, but it was rusted solid from decades of wet grinding. He chained the machine to the backhoe, then went back for a cutting torch and torched off the four large nuts. He lifted the polisher with the backhoe but it was unwieldy and quite heavy. He called for his son to come over with a forklift. The two of them did a lot of maneuvering to extract the machine. It was much more complicated than any of us had anticipated. They loaded the polisher. I strapped it down, paid them, and headed for the NY State Thruway. Turns out that the flatbed truck would not go above third gear. I drove 75 miles to New Paltz, doing 40 mph with the flashers on the whole way.
Warren Jewett sat waiting for me on his tractor as I pulled onto Huguenot Street. I drove into the pasture next to the cowshed, and Warren offloaded the polisher onto some pallets adjacent to the cowshed. I covered the machine and returned the truck to New York City. I was ecstatic.
I later built a vented shed over the polisher, and every Summer for twelve years, I would open the shed and brush clean motor oil over the machine.
I eventually bought a sizeable workshop 18 miles from New Paltz in the beautiful foothills of the Catskills. I rented a walk-behind diamond saw and cut a 4ft x 4ft opening in the concrete floor. I excavated to bedrock and bored into that to attach the steel reinforcement cage for the concrete foundation/counterweight. The hard part of erecting the machine was to center and keep vertical the four 1-inch diameter threaded rods that would protrude from the concrete base. These had to correspond exactly to the holes in the stanchion’s base flange. Happily when a backhoe lowered the polisher onto its new concrete base, it was a perfect fit. When I tightened the large nuts to the bolts securing the base flange to the massive concrete base, I heard choirs of angels singing.
I had the motor reconditioned, wired the on/off switch near the operator’s ring, and ordered new leather belting that was quite expensive. The silicon carbide grinding segments were no longer available, but I contacted National Grinding Wheel Co. They had the original molds and said that if I placed a large enough order, they’d fill it. I ordered a lifetime supply of segments, and so I’m good to go. I’ve added diamond technology as well, but there are times when I prefer silicon carbide.
My polisher, made by the Patch Company of Rutland, VT is now 102 years old and still runs great. They sure knew how to make things back then.
So there you have it—that’s how Lorenzo got his polisher.
This story is dedicated to Stanley Mazeka and Warren Jewett, two fine gentlemen who currently reside in heaven. Thank you for helping me, and I hope to do you proud. Rest in peace.
How Lorenzo Got His Polisher – Part 1
The Rescue of a Giant Antique
Back in the early 1980’s, I used to buy terrazzo chips and supplies at Zanin, which was one of the great old terrazzo supply houses. They were located in Weehawken, NJ, just on the other side of the Lincoln Tunnel. Inside their huge warehouse was a surreal landscape of pallets stacked high with a 100lb. burlap sacks of terrazzo chips, as far as you could see. It was eerily quiet and business was obviously dead. People there had time to talk, including old man Zanin himself, up in his office, who was quite chatty. Clearly all was not well. And acting on a hunch in January 1987, I called Zanin up to see how they were doing. The secretary said they were closing down, and all inventory was steeply discounted. I rented a truck and bought as many marble chips as I could. This was the beginning of my “terrazzo archive.”
One of the friendliest characters at Zanin was Marco, the forklift driver, who would load your order onto your truck. He was a ringer for Uncle Fester of the Munsters.
One day, a couple of years before Zanin closed down, Marco reached down from his forklift (which he called a high/low) and offered me a business card. He said, “Why doncha visit my friend Stanley?” The card said, “Allied Terrazzo Co. Precast Treads Risers Stringers Cove Base Sills & Saddles.” The address was 129th Street in College Point, Queens.
I called and arranged to visit Stanley at his workshop in an industrial part of Queens. He told me that I could bring some terrazzo to grind if I liked.
Stanley was a big strapping fellow of Polish descent, Stan Mazeka. He was a really nice guy, quite friendly, and in his mid-sixties when I met him. He commented jovially that we had a lot in common as non-Italians in the terrazzo trade. He told me that he had made 90% of the precast terrazzo stair treads for public schools in Long Island. Now, Stanley was just trying to pay the rent on his workshop by renting time there to people like me.
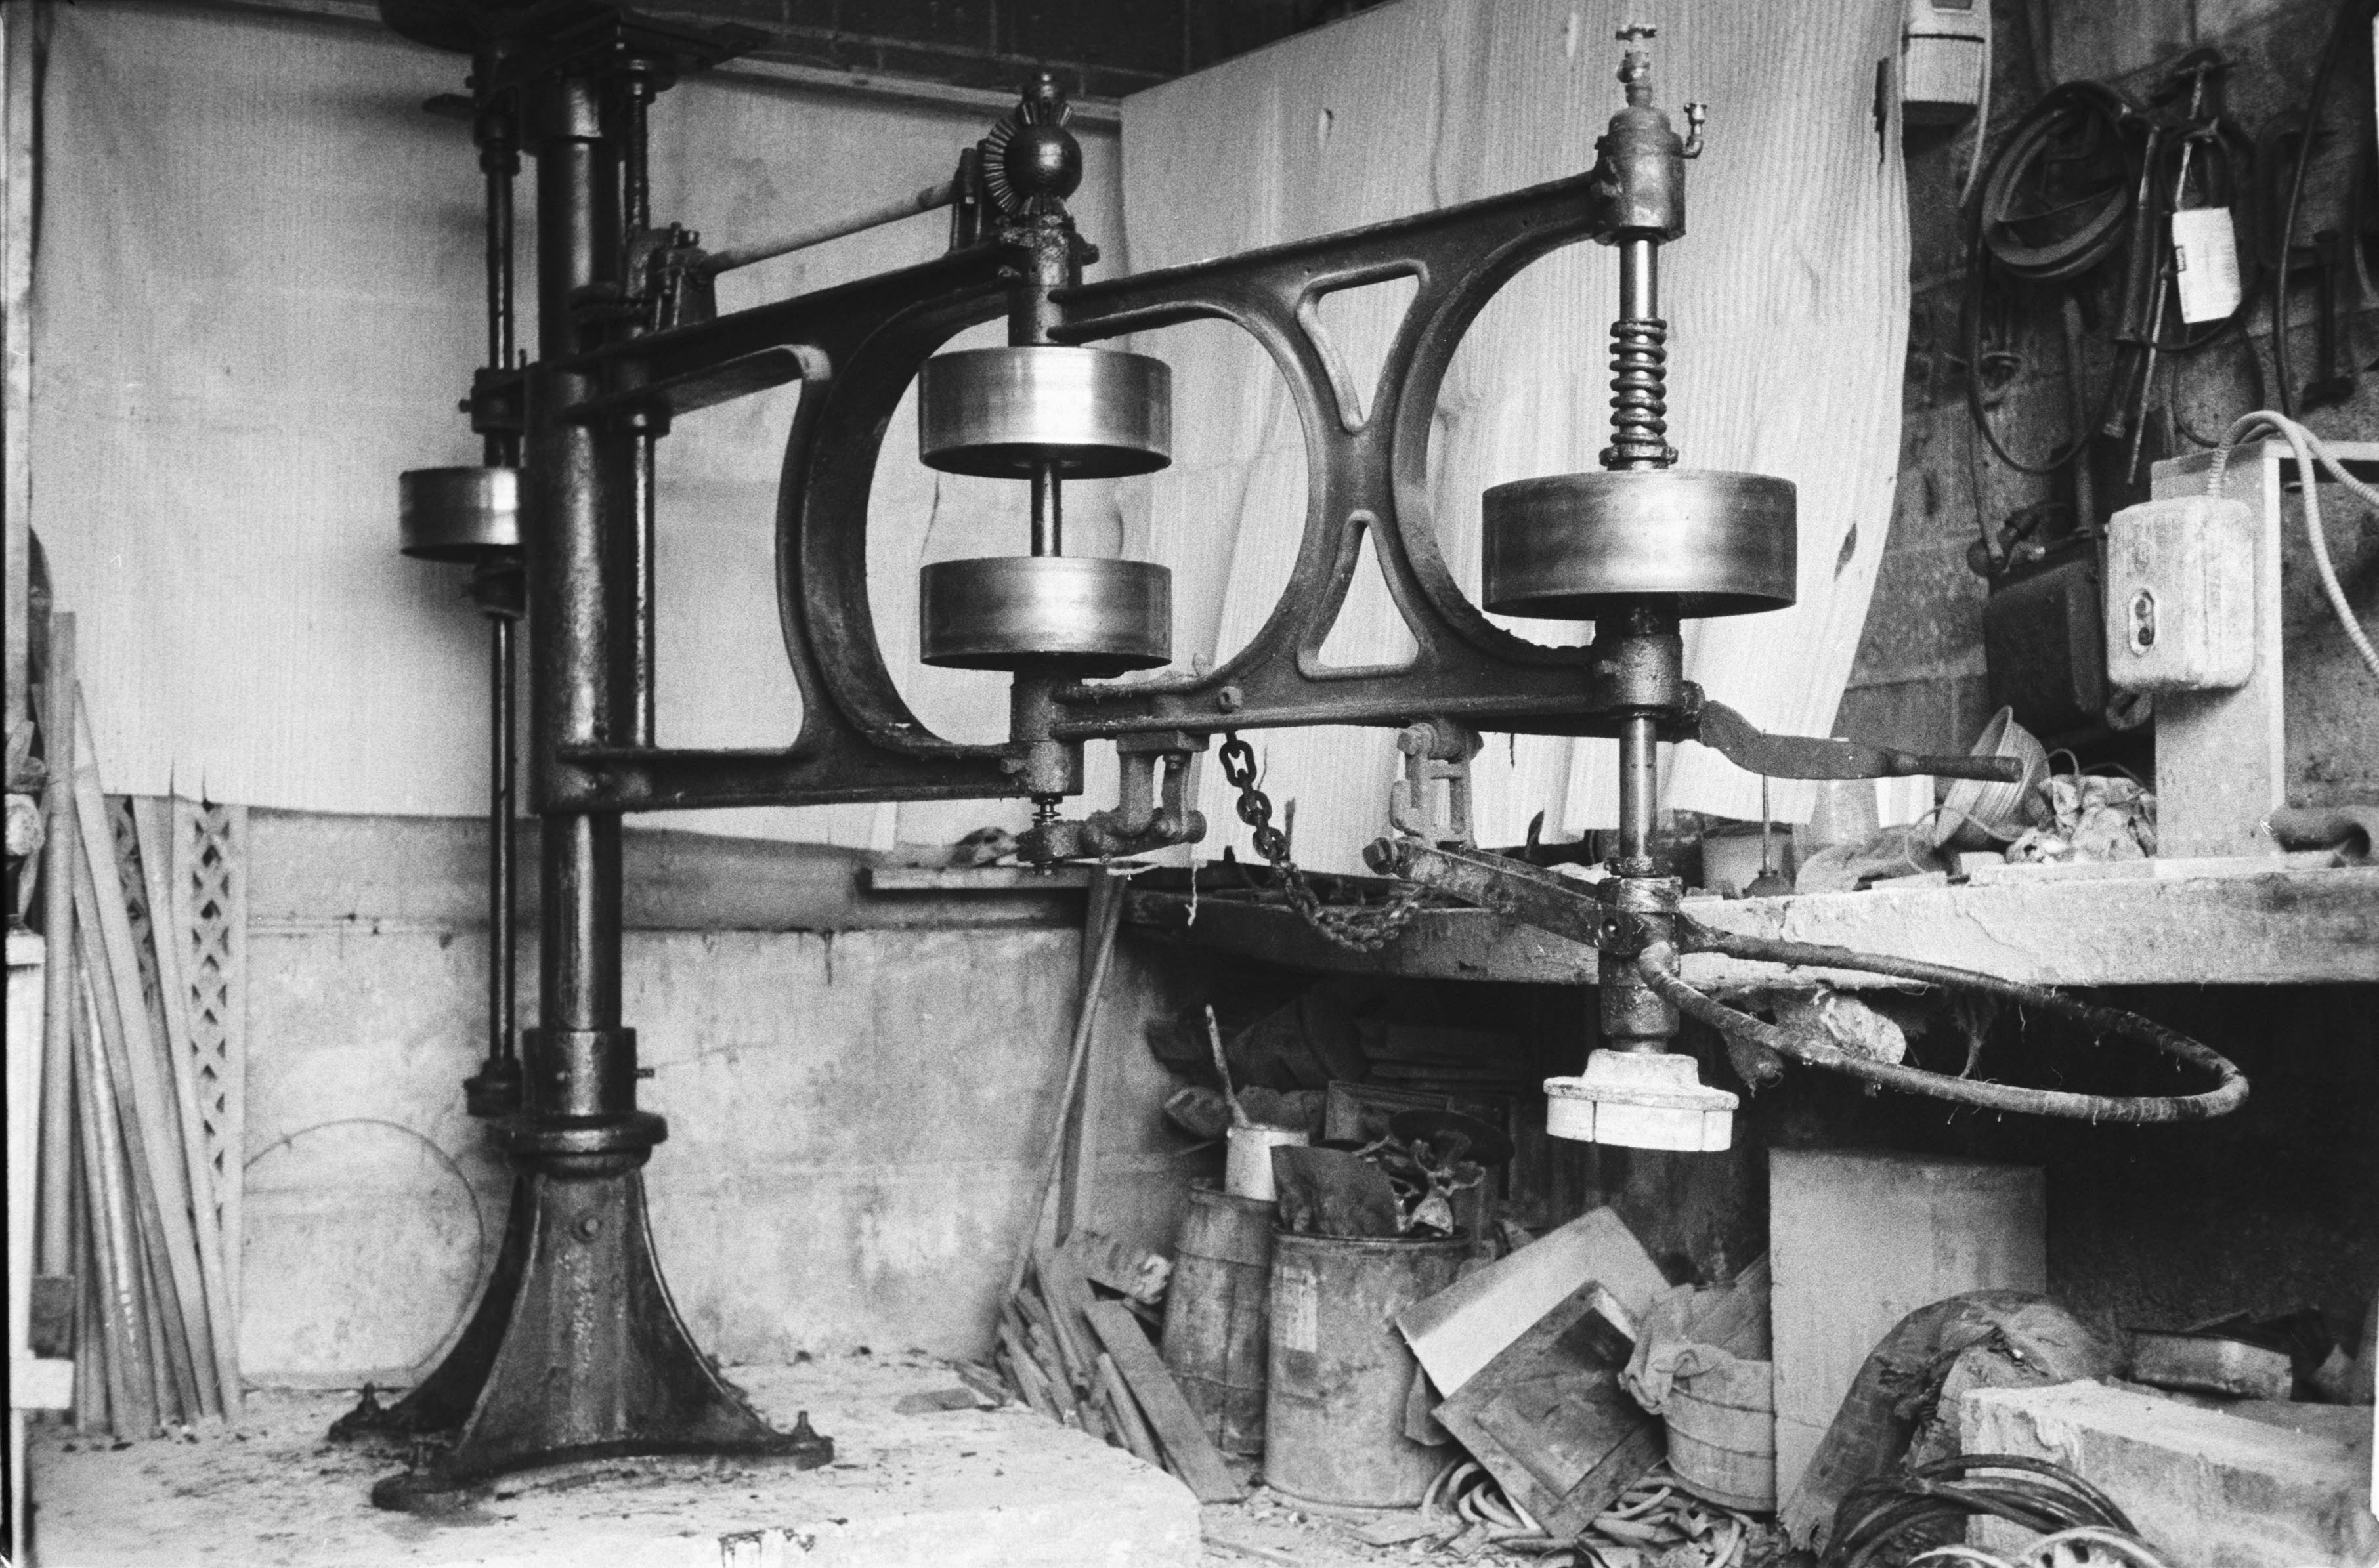
Presiding over Stanley’s smallish workshop was the commanding presence of his radial arm polisher, a stone grinding machine. A huge cast iron affair, it stood about ten feet tall and its long leather belt-driven arm had a 16-foot sweep. It was made in 1912 by the Patch Company in Rutland, VT. It had a monster 220-volt three-phase General Electric Motor made in Schenectady, NY that sat on top and turned a large cogwheel. The gear at the end of the motor’s spindle that drove the transmission was made of alternating stars of leather and bronze. This provided some give when starting up cold. I had never seen that before or since. The machine was telescoped onto, and rotated around a large stanchion that ended in a huge base flange that was bolted into what Stanley told me was a giant cube of reinforced concrete. At the end of the polisher’s long arm was a fitting that accepted the various grit twist-on grinding heads. These had a center hole to allow water to come down through the machine itself and centrifugally wash away the dust produced, creating slurry. The business end of the grinding head was a steel plate that had fittings to accept the five silicon carbide grit segments that formed a star pattern. The steel plate, or “iron,” is heated cherry red, then flake shellac is dropped onto this. Next the segments are placed into the fittings and are thus attached. Connected to the end of the machine is the large circular steel operator’s ring to control the grind. There were lots of fittings for greasing the machine, which was fairly caked with grease, both old and new.
I brought a terrazzo piece to Stan’s. He put it on his inclined grinding bed, leveled the piece, then showed me how to operate the beast. He put a hill of quartz beach sand on the terrazzo, then put the machine over this with a 24-grit head. He opened the water valve on top, adjusted the flow then switched the machine on. The sand was very effective at scratching up the terrazzo. I appreciated how grinding with beach sand was an ancient technique from a couple of millennia back. Stan showed me how to throw the next hill of sand under the grinding head without turning the machine off. I mastered this but don’t recommend it, as it is too dramatic. I think he did this because it was a chore just to start and stop the polisher. The on/off switch was in a box near the wall, so you had to start and stop grinding near there. It was a little tricky to control the machine with one arm while you groped for the switch with the other. Later, there would times when I was fatigued and had to desperately try to hit the off button before an arm cramped. If this were my machine, I thought, I’d rewire the switch close to the operator’s ring on the machine.
 So you rough grind with sand in this manner until you can see that you have ground halfway through the thickness of the aggregates in your casting, and they are well exposed. You then thoroughly wash the terrazzo and the grinding head to remove absolutely all grits, then continue grinding with the silicon carbide 24-grit head with no sand. You change heads and go up through grits to 600-grit, always squeegeeing off the water to assess the terrazzo dry to see if you have removed all scratches from the previous grade of grit. Lastly, you put on the mop and polish with polishing powder.
I could see that as much work as it was to grind with this powerful machine, it was easier than the way I was then grinding, which was to use terrazzo floor equipment. And before that, starting in 1979, I ground with a handheld grindstone, a sponge and bucket of water and elbow grease, if you can believe that.
So it went on like this for a couple of years. I was able to cast designs that were larger in size, grind them at Stanley’s, and pay his landlord, who operated an adjacent pipe-lining business.
But things were changing in College Point, Queens. There were new residential and commercial developments popping up. Industry was slowly disappearing… (to be continued)
The Story Behind the Vase Table
Vase Table
The Vase Table was a breakthrough for me in combining other industrial processes together with terrazzo. These processes were aluminum spinning and aluminum sand casting. I had little knowledge of these processes prior to designing the Vase Table.
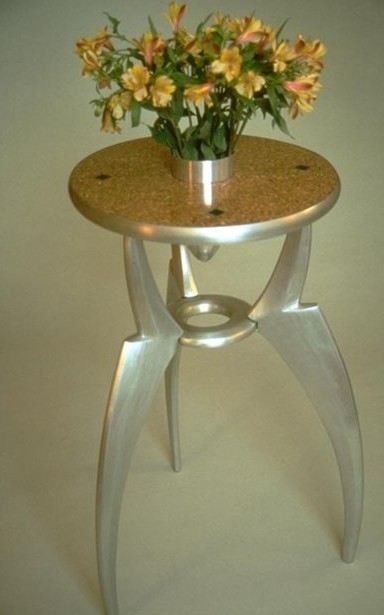
I made the Vase Table in 1994. The circular terrazzo top is 19-1/2 inches in diameter, enclosed by a polished spun aluminum rim. The terrazzo is divided into quadrants by aluminum cloissons, or divider strips. Each cloisson includes an aluminum diamond that is filled, intarsia-like, with green marble. The polished terrazzo is crushed Italian Rosso Verona marble, in an earth-red cement matrix. The center of the table has a four-inch hole to accommodate the tapered and polished aluminum vase that penetrates it.
The substantial base is a tripod made of solid cast aluminum. Each leg is nicely proportioned with shapely curves, attached to a central ring. The whole base was ground and polished by hand prior to being assembled and welded together.
In 1993 I learned of a metal spinning operation located in Long Island City, Queens, called Gem Metal Spinning and Stamping. I visited them. The first signs of gentrification of this manufacturing area were starting to appear. Twenty years later, there are many super-block luxury high-rise buildings adjacent to Gem Metal’s location, which is now closed.
My first visit to Gem Metal showed a sizeable and well-equipped plant that looked forlorn and vacant. Its owner, Steve, inherited the factory from his parents, who presided over its now-vanished industrial heyday. The holloware they produced was used as components for the lighting industry. Their peak was decades before my appearance. Steve grew up in the business and was just trying to hang on and meet costs. He told me he hoped to sell out to a real estate developer. He kept a skeleton crew and did small, limited-run jobs for designers like me. A sizeable locker room and huge industrial hand washing sink spoke of an earlier workforce of many employees. It was now ghostly.
Steve toured me around, showing me machines and explaining processes. I looked around at samples of spun aluminum shapes and the collection of hardwood forms used to make them. It all looked kitschy and uninteresting, a 1950’s sensibility. I asked to see his garbage. Out back in drums for recycling, I found an aluminum rim and a nicely shaped vase. I placed the vase inside the rim, and voila’ the Vase Table was born. I met Steve’s minimum order for multiples of rims and vases, and set about designing the rest of the Vase Table in earnest.
Aluminum spinning uses a motorized lathe. Circular blanks are cut from sheet stock. The blanks are centered on the motor’s spindle and clamped against the chosen hardwood form. A large harpoon-like tool is levered against the spinning blank and gradually worked into the blank until it conforms to the desired shape. Some grease is used. The same process applies for brass spinning, but brass must be annealed afterwards in an oven.
A fellow designer told me of a foundry in Brooklyn—J&J Bronze and Aluminum Casting on Huron Street. I did not know that they were the last foundry in New York City.
I visited them, and they showed me around and explained their process, sand casting. Essentially I had to carve in wood the patterns I wanted to cast. They had to be made in two pieces that joined together in the middle with dowels so that there would be good registration when casting. They had to be tapered so they could easily separate from the mold.
I sketched a great number of possible base designs until I came up with a leg that I found appealing. I then sculpted several scale-model legs out of extruded polystyrene, before settling on an exquisitely shaped leg. Next, the full size two-piece patterns for casting were carved. Lastly, the two-piece ring that would connect the legs in the center was carved. A ring of flat aluminum plate would connect the legs on the top.
I brought my patterns back to the foundry, which was humming with activity. They attached the patterns to a plywood match plate which would be pressed into the special sand they used for casting. The sand was in two halves of a rigid flask which was later bolted together. My patterns were painted with a heat-resistant paint. They added material to provide pathways for the molten metal to flow into the negative spaces created in the mold. This is called the gating system.
J&J’s mold maker added a riser which creates a void to allow extra material that offsets shrinkage during cooling. They added a sprue, the vertical part of the gating system. One end connects to the pouring cup where molten metal enters the mold; and the other end connects the runners to the gates which control the flow of molten metal.
After casting, I collected my order. The castings had a rough texture and were not at all smooth. Some fine amounts of metal came out at the seams. This was called flash, which they cut off with a band saw.
I ground the castings on a drum sander using increasingly finer grits until they were smooth and polished. I made a jig to clamp the three legs and center ring in position, and then had them welded together.
The Vase Table is a tribute to vanishing New York industries–and a design I will always be proud of.
On the Difference between Grinding and Polishing
 Caution: Portions of the following contain humor. If you have no sense of humor, discontinue reading now.
Well time has certainly passed since I started working with precast terrazzo. I could say that I had worked across five decades—which is true, since I started in 1979. But a more accurate accounting says this year is Number 33.
During this time, I have ground and polished more than my share of terrazzo. As with any basic process repeated endlessly over time, one comes to a deeper understanding of just what the heck one is doing. This is called insight (seeing the inner nature of the same old thing).
And so it goes with grinding and polishing, two critical steps that help distinguish precast terrazzo from its lately more popular first cousin, cast concrete; or more accurately, precast concrete.
The insightful difference between grinding and polishing, in essence, is this: grinding is scratching a surface; and polishing is melting it.
Here’s a simple experiment you can try at home to help make your understanding of grinding more, um, concrete. First, buy a shiny new car (I like Lamborghinis). Next, put a bit of beach sand on the hood. Place a smooth brick on the sand, and rub briefly in a circular motion. Remove brick and sand, and observe. You will notice score marks on the surface, and dust. The grits of sand, being harder than the paint, have scratched furrows into the surface. Behind the scratching action of the grits, plumes of dust have come out of those furrows. This is grinding at its most basic. You want to grind wet to remove the dust, expose new surface, and keep your grinding medium clean and sharp.
Polishing terrazzo is entirely different. You are ready to polish when you have ground with successively finer grits, say 400 or 500 grit, and no scores are visible. The terrazzo should be bone-dry for best results. You can buy polishing powder or mix your own by combining tin oxide, powdered oxalic acid and flake shellac made from the bodies of the Asian Lac Beetle. (Wear a respirator.) Change the grinding head to a polishing pad or “mop.” Put some powder on the surface and mist it with a spray bottle. Spread this mud evenly over the surface with the polisher, moving in small tight circles. As it begins to dry out, bear down strongly on the polishing head to create heat of friction. Move slowly. This heat and pressure will superficially “melt” the surface, creating a vitreous surface. Mother of pearl shell, when polished in terrazzo, will light up and become incandescent from the heat—truly a sight to behold.
Caution is indicated, as it is possible to overpolish and “burn” a surface. You then have to regrind and repeat all the steps once more.
To recap, once again, grinding is scratching, and polishing is melting—completely different processes. These can both be done by hand, but are extremely tedious. I did this handwork my first three seasons before I even knew that I was doing terrazzo, or that equipment existed.
Specialty Aggregates

Specialty aggregates are great design elements, and they add a lot of pizzazz to the terrazzo.
I go to the coast of New England to source clam shells, which I crush and grade myself. This is the recycled waste from the seafood industry. Clam shells are wonderfully variegated, and take a nice polish.
Crushed mother of pearl shells have the same gorgeous iridescence as the pearls themselves. They are the recycled waste from the cultured pearl industry. When polishing a terrazzo surface, I bear down to create heat and pressure, which helps create a bright shine. When there is mother of pearl in the mix, the heat will illuminate it with incandescence, quite a sight to see. I have not experienced this phenomenon with other mineral aggregates.
Aluminum and brass “chaff” are sourced from the waste stream of industries that mill these metals to make their products. They are small bits of metal that catch the light and add visual interest. Aluminum chaff really pops against a black background. Brass and aluminum letters are another specialty option. They create custom surfaces that speak.
I have pulled a lot of mirrors out of the trash. I crush and sift them. In terrazzo, mirrors create a dazzling effect, much like feldspar that occurs in granite.
Venetian terrazzo consist of oversized aggregates—so called because the palazzos in Venice used these large aggregates, to handsome effect, in their floors. More grinding is required in the process.
All manner of minerals, such as geodes and fossils, can be inlaid in terrazzo. You can find some great items at your local gem and mineral show, and it won’t break the bank. Glass aggregates are abundant and are another recycled ingredient.
There are other options, but the trick is to choose aggregates of a similar hardness, so that it all grinds evenly.
Furniture as Jewelry

Dolphin
Dolphin and Brooch Table are part of my Furniture as Jewelry series. These pieces were designed as oversized brooches, and reflect the fundamental lapidary nature of terrazzo as a medium. The mosaic tables are perforated by brass rods, or embedded with brass elements that create textural counterpoint to their otherwise smooth, polished marble surfaces. Mosaic graphic designs are rendered in brass cloisonné. Dolphin Table was declared a winner in the nationally juried art furniture competition, Furniture of the Nineties, sponsored by the American Society of Furniture Artists and Parson’s School of Design.

